Author

Stephen J. Birchard DVM, MS, Diplomate ACVS

Friday, December 19, 2014

Permanent Tracheostomy in Dogs: A life-saving surgical option for severe upper airway obstruction.

Permanent tracheostomy is a well-recognized surgical technique used in animals and humans as a salvage procedure to treat severe upper airway obstruction. Although the technique has been used for many years with success, there are many misconceptions among animal owners and veterinarians about the long-term care and complications. Many feel that dogs cannot have a good quality of life because of the problems associated with tracheostomy. Owners frequently expect that dogs with permanent tracheostomy will have an appliance, i.e. a metal or plastic tube that resides with in the trachea and needs constant care.

Indications for tracheostomy in dogs include: severe laryngeal obstruction due to laryngeal paralysis, collapse, neoplasia, or trauma, pharyngeal neoplasia that obstructs the larynx, and non-resectable proximal tracheal neoplasia.

Although cats may also develop disorders causing severe upper airway obstruction, permanent tracheostomy is associated with frequent, severe complications such as excessive mucous production and stoma stricture.(1) As a result, tracheostomy is rarely recommended in cats.

Preoperative Considerations

Dogs being considered for tracheostomy should be thoroughly evaluated with particular emphasis on the respiratory tract.  A complete history and physical examination followed by appropriate imaging such as thoracic radiographs are important before performing general anesthesia and surgery. Cervical radiographs and even tracheoscopy may be necessary to be certain that the respiratory tract downstream from the larynx is normal. Also, carefully examine the dogs’ ventral cervical area to determine suitability for creating a tracheostomy stoma. Some dogs, such as brachycephalic breeds, have very short necks with excessive skin that can cause problems with skin flaping over the stoma causing obstruction.

Surgical Technique

The dog is placed in ventral recumbency with the neck hyperextended over a soft towel and the front legs extended caudally. The ventral cervical area is clipped and prepared for aseptic surgery. A ventral midline skin incision is made from the larynx to just cranial to the manubrium.  The paired sternohyoideus muscles are divided on their midline using sharp dissection. A large horizontal mattress suture of 2-0 or 3-0 PDS is placed across the sternohyoideus muscles, dorsal to the trachea, to allow retraction of the muscles and cause ventral displacement of the trachea.(Fig. 1) 
Fig. 1: Ventral midline cervical approach for permanent tracheostomy.
The sternohyoideus muscles have been divided and a horizontal mattress suture
is being placed in the muscles to tuck the muscle under the trachea.
Care is taken to avoid trauma to the recurrent laryngeal nerves during passage of the suture. A rectangular window is created in the trachea from the 3rd to the 7th ring (4 rings included in the tracheal opening).(Fig. 2) 
Fig. 2: The rectangular window is being created in the tracheal wall.
Note the endotracheal tube present in the tracheal lumen.
The tracheal incisions are begun by incising between rings 3 and 4, then between rings 7 and 8. Be careful not to puncture the cuff of the endotracheal tube when making the initial tracheal incisions. These parallel incisions are then connected using scissors to complete the rectangular shaped defect in the trachea.(Fig. 2)

Close the tracheal wall to the skin in a simple interrupted pattern to create the tracheostomy stoma. Excise a rectangular shaped section of skin on each side of the tracheostomy site to allow the skin incsion to match the rectangular window in the trachea. The suture bites of trachea include the cartilage, and the bites of the skin are placed split thickness, entering the dermal layer and exiting the epidermis.  This allows for accurate apposition of the epidermis to the tracheal mucosa. As in urethrostomy closure, take suture bites from inside out, i.e., start in the tracheal lumen and then take the bite of the skin. The corners of the window are closed first (Fig. 3,4); then the remaining areas are closed in a similar fashion.(Fig. 5) Absorbable suture such as 3-0 or 4-0 PDS is used to avoid having to remove them once the stoma has healed. The skin incisions cranial and caudal to the stoma are then closed routinely.
Fig. 3: The 4 corners of the rectangular tracheal window are closed first.
Note the "inside-out" sequence of suture placement.
Fig. 4: The corner sutures have been placed.

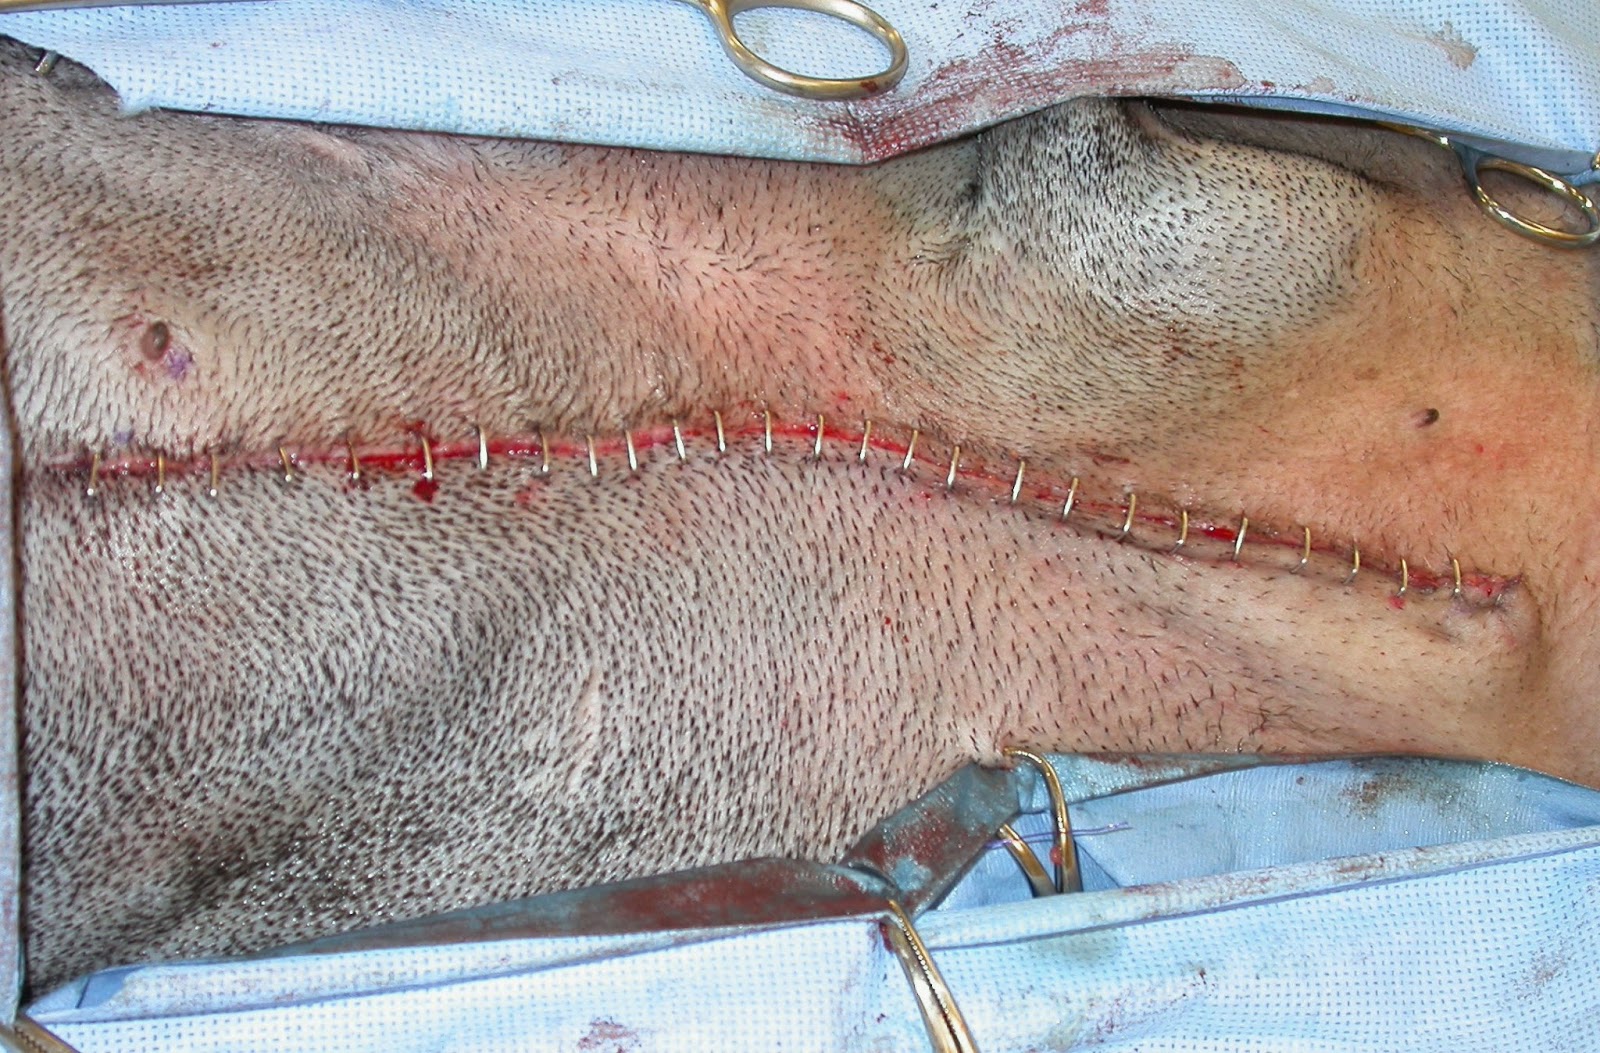
Fig. 6: Completed suture closure of the tracheal stoma. 
Postoperative Care

Alleviation of inspiratory dyspnea is immediate after permanent tracheostomy. See below video of an elderly labrador with laryngeal paralysis before and after permanent tracheostomy. Although laryngeal tie-back is the treatment of choice for most dogs with laryngeal paralysis, permanent tracheostomy was chosen in this dog due to high risk for aspiration pneumonia.
Besides routine postoperative care such as analgesics, cleansing of the stoma is important to prevent build up of discharge and debris. (Fig. 6) Gently wiping the skin around the stoma with moistened gauze sponges is sufficient.


Fig. 6: Typical appearance of a recently preformed permanent tracheostomy
in a Yorkshire Terrier with severe laryngeal collapse.
Owners should be advised to avoid putting anything inside of the trachea and to not use any irritating materials around the stoma such as peroxide or other antiseptics. Small amounts of a petroleum-based ointment (e.g., triple antibiotic ointment) can be placed on the skin around the stoma to prevent discharge from adhering to the skin and make cleaning easier. Discharge from the tracheal stoma tends to gradually decrease over the first few weeks postoperatively. Systemic antibiotics are not routinely prescribed since incisional infections are very rare.

Life Style Limitations
Dogs with a permanent tracheostomy cannot go swimming and should avoid very dusty environments or running in tall grass or weeds. These dogs will also will have difficulty barking or at least have a softer sound than pre-operatively. In rare cases dogs with long hair will need clipping of the hair around the stoma to prevent irritation of the tracheal mucosa and accumulation of debris.

Prognosis

Most dogs with permanent tracheostomy do well and have minimal chronic problems. The most common long-term postoperative problems are pneumonia and stricture of the stoma requiring surgical revision.(2) In a recent study sudden death occurred after tracheostomy in 5 of 19 dogs at variable times after surgery, presumably due to obstruction of the trachea although necropsy was not performed in any of the cases.(2)

Permanent tracheostomy is considered an appropriate surgical option for dogs with severe upper airway obstruction. Complications can occur but some, like stoma stricture and skin fold occlusion, can be treated by revision surgery. Owner education is important to explain potential risks and life style limitations.

References

1. Stepnik MW1, Mehl ML, Hardie EM et. al. Outcome of permanent tracheostomy for treatment of upper airway obstruction in cats: 21 cases (1990-2007). J Am Vet Med Assoc. 2009 Mar 1;234(5):638-43.


2. Lindsay L. Occhipinti and Joe G. Hauptman. Long-term outcome of permanent tracheostomies in dogs: 21 cases (2000–2012) Can Vet J. Apr 2014; 55(4): 357–360.

Tuesday, November 18, 2014

Intravenous Fluids in Anesthetized Dogs and Cats: Are we giving too much?

Intravenous fluid therapy is one of the most important perioperative treatments veterinarians provide for their patients. Intravenous fluids are considered a necessary part of the anesthesia protocol because of hypotension and vasodilation that can occur due to the anesthetic drugs. 

All animals being prepared for anesthesia and surgery need to be assessed for hydration status and disorders that create fluid losses, e.g. vomiting and diarrhea. Intravenous fluid dosages will be influenced by the animal’s current hydration and ongoing fluid losses. Intravenous fluid dosages may also be affected by disorders that could predispose the animal to over-hydration such as cardiac or renal disease.

The traditional intravenous fluid rate for healthy animals under anesthesia has been 10ml/kg/hour.(1) In the recent AAHA/AAFP fluid therapy guidelines, this recommendation has been revised.(2) Table 4 from the paper describes current fluid therapy guidelines for anesthetized cats and dogs:

Table: Recommendations for Anesthetic Fluid Rates (from: 2013 AAHA/AAFP Fluid Therapy Guidelines for Dogs and Cats. Harold Davis, BA, RVT, VTS (ECC), Tracey Jensen, DVM, DABVP, Anthony Johnson, DVM, DACVECC, et.al., J Am Anim Hosp Assoc 2013; 49:149–159)

- Provide the maintenance rate plus any necessary replacement rate at <10 mL/kg/hr
- Adjust amount and type of fluids based on patient assessment and monitoring
- The rate is lower in cats than in dogs, and lower in patients with cardiovascular and renal disease
- Reduce fluid administration rate if anesthetic procedure lasts 1 hr
- A typical guideline would be to reduce the anesthetic fluid rate by 25% q hr
until maintenance rates are reached, provided the patient remains stable

Rule of thumb for cats for initial rate: 3 mL/kg/hr
Rule of thumb for dogs for initial rate: 5 mL/kg/hr

Note that not only are the initial fluid rates lower than the previously recommended 10ml/kg/hr, but a schedule for gradual reduction of fluid rates as the anesthetic period progresses is also recommended. These guidelines are considerably different from what was previously thought to be necessary fluid rates for anesthetized animals, but are based on carefully considered factors, evidence based medicine, and clinical experience of board certified specialists.

References

1. Ann Weil, DVM, DACVAA. Anesthesia reboot: Erase these myths and misconceptions. Veterinary Medicine, October 2014, pg. 318.

2. Harold Davis, BA, RVT, VTS (ECC), Tracey Jensen, DVM, DABVP, Anthony Johnson, DVM, DACVECC, et.al. 2013 AAHA/AAFP Fluid Therapy Guidelines for Dogs and Cats. J Am Anim Hosp Assoc 2013; 49:149–159.

Questions:

What are your thoughts or opinions about this change in recommended fluid dosage?

In private practice, in which anesthetized patients do you typically run intravenous fluids; in all animals or do you have some kind of selection criteria? In other words, what do you think the standard of care should be for fluid administration under anesthesia?

Please post comments either here on the blog site or on my facebook page:
Dr. Stephen Birchard, Veterinary Continuing Education

.

Monday, November 10, 2014

Large Tumor On The Skull of a Dog: The story of "Rocky" the Norwegian Elkhound

Rocky was a 7 year old male castrated Norwegian Elkhound. Several months previous to presentation he developed a slowly growing firm mass on the dorsal cranium.  The owners reported no other significant health problems. 
Fig. 1: This is Rocky under anesthesia being prepared for surgery.
Note large mass on the dorsum of the skull.
On physical examination the mass was well circumscribed but not movable.(Fig. 1) Neurologic exam revealed mild posterior paresis. In all other respects Rocky was behaving like a normal dog.

Diagnostic Evaluation

Radiographic evaluation found no evidence of metastasis of the mass in the lungs or abdomen.  A complete blood count and serum chemistry profile was within normal limits. MRI of the skull showed a very large ossified mass of the dorsal cranium extending ventrally into the cranial vault.(Fig. 2)
Fig. 2: MRI of Rocky's head. Note large skull mass (arrows) that extends ventrally.
Surgery

Although Rocky’s owners were warned about risks of surgery such as brain injury, hemorrhage, infection, and possible incomplete resection of the mass, they wanted to pursue surgical removal. They also knew that the most likely neoplasms causing the tumor were osteosarcoma or multilobular osteochrondrosarcoma.

Rocky was anesthetized and placed in sternal recumbency. His entire head was prepared for aseptic surgery. (Fig. 3)
Fig. 3: Preoperative view of Rocky just prior to beginning of surgery
A midline approach over the mass was performed. Sharply dissecting soft tissues including the temporalis muscles, and retracting them laterally, easily exposed the mass. (Fig. 4) 
Fig. 4: Surgical exposure of the skull mass after dissection of the soft tissues.
Dorsal is to the top of the photograph.
Careful blunt and sharp dissection at the base of the mass allowed for gradual moblilization, and the mass and the involved cranium then easily lifted off the remainder of the skull and were excised. (Figs. 5,6)
Fig. 5: Most of the skull mass has been reflected off the remainder of the skull and is
being held upside down in my hand.
Fig. 6: The resulting skull defect after complete removal of the mass.
Moderate hemorrhage occurred from remnants of tumor attached to the dura and at the edges of the skull. Hemostasis was achieved with judicious electrocautery and hemostatic sponges. Careful debridement of the remaining gross tumor was attempted but was difficult because of poor exposure due to recurrent hemorrhage, and attachment of the mass to the dura.

The skull defect was filled with an autogenous fat graft that was aseptically harvested from Rocky’s lumbar area. The temporalis muscles were then mobilized by undermining them from the skull and used as the first layer of closure by suturing them together on the midline. The remaining tissue layers were closed routinely.(Fig. 7)
Fig. 7: Closure of the temporalis muscles over the skull defect
Postoperative Care and Follow Up

Rocky made an uneventful recovery from anesthesia. Repeat neurologic examination revealed no change from his preoperative status. Routine supportive care and analgesic therapy was administered.

Rocky was discharged from the hospital several days postoperatively. Histopathology of the mass revealed a multilobular osteochondrosarcoma. Two weeks later he was examined for suture removal and was doing very well, including improvement of his posterior paresis. He was rechecked again several weeks later and was continuing to do well.(Fig. 8)
Fig. 8: Rocky at his recheck examination several weeks postoperatively
The owners declined any adjunctive therapy such as radiation or chemotherapy, for the tumor.  Approximately 9 months postoperatively Rocky’s mass began to re-grow. Several months later the owners elected to have Rocky euthanized. 

Discussion

Multilobular osteochondrosarcoma (MLO) is a well-described tumor of bone and frequently found on the skull in dogs.(1) The tumor is typically slow growing but locally invasive and can be metastatic. Complete resection of a small MLO can have a good prognosis. However, recurrence of tumor commonly occurs after incomplete resection (approximately 50% of cases) as was the case in Rocky. After surgical treatment, disease free interval of 288-1332 days has been found depending on tumor grade. (2)

Options for reconstruction of large defects of the cranium include rigid materials like polymethylmethacrylate, mesh implants, or autogenous soft tissues using the temporalis muscles. (3) An autogenous fat graft to protect the dura combined with temporalis muscle reconstruction was an effective option for Rocky.

An extraordinary aspect of this case is that Rocky had severe compression of his cerebrum by the tumor, yet had only mild neurologic signs. He also made a surprisingly uneventful recovery from surgery and lived about 1 year postoperatively. Of course we would have preferred to achieve a complete resection of the mass but that was not possible without risking serious complications.

Post questions or comments about Rocky either here or on my Facebook page, Dr. Stephen Birchard, Veterinary Continuing Education. Thanks!

References

Multilobular osteochondrosarcoma of the canine skull: 16 cases (1978-1988).
JAAHA 1989, 195(12):1764-1769]

2. Veterinary Society of Surgical Oncology website: http://www.vsso.org/Bone_MLO.html


3. Boston, SE. Craniectomy and orbitectomy in dogs and cats. Can Vet J. May 2010; 51(5): 537–540.

Monday, November 3, 2014

Closure of Elliptical Incisions in Dogs: The "Rule of Halves"

Elliptical incisions commonly result from removal of skin tumors, other lesions, or debridement of traumatic wounds. Since loss of a section of skin occurs, the closure of the defect can result in so called “dog-ears” at each end of the incision (small flaps of skin that protrude from the ends of the incision).  An easy method to prevent dog-ears and create a cosmetic and secure closure is the “rule of halves” technique, also called bisectional closure. (Fig. 1)
Fig. 1: The rule of halves for closing elliptical incisions.
Dotted lines represent placement of sutures
This technique is used for the deep fascia and subcutaneous layers of the wound. The sutures below the skin relieve the tension across the incision and align the skin edges making the final suturing of the skin much easier.

Technique for the Rule of Halves Closure

Take the first suture bite of the deep fascia and/or subcutaneous tissue in the middle of the incision. (Fig. 2)
Fig. 2: Surgical model of elliptical incision.
The subcutaneous tissue is red, the skin is pink.
Dotted line indicates where first subcutaneous suture is placed.
This divides the incision into 2 equal parts. (Fig. 3)
Fig. 3: First subcutaneous suture has been placed.
Dotted lines indicate placement of the next 2 sutures.
Now take suture bites in the middle of each of the 2 defects, then in the middle of the 4 defects, and so on until the subcutaneous layer is completely closed. (Fig. 4) 
Fig. 4: Final subcutaneous suture being placed. Note that the suture knot
is buried by taking the first bite, from inside out, on the side closest to the surgeon.
Then suture the skin routinely. (Fig. 5)
 
Fig 5: Completed closure

This technique for wound suturing, although somewhat more time consuming than doing simple continuous patterns for the subcutaneous layer, results in a very secure and cosmetic closure. (Figs. 6-8)
Fig. 6: Proposed lines for excision of a mast cell tumor in a dog.  (X = tumor,
circle indicates 3 cm margins, elliptical lines are proposed incision)
Fig. 7: Same dog as in Fig. 6 after excision of the tumor and surrounding skin.
Dotted line indicates location of first suture.
Fig. 8: Completed closure of same dog in Fig. 6.

Post questions or comments here or on my Facebook page (Dr. Stephen Birchard, Veterinary Continuing Education)


Saturday, October 11, 2014

Cystotomy for Removal of Cystic and Urethral Calculi in Dogs: Are you getting them ALL out?


The short answer is: maybe not! Cystotomy to remove urinary calculi is one of the most common surgeries performed in small animal private practice. It is a surgical procedure that is considered to be straightforward and easily performed. However, removal of all calculi can be challenging. One study found that in 20% of dogs cystotomy failed to remove all calculi.(1) 

Key Point: Recurrence of calculi after cystotomy may be due to calculi left behind rather than formation of new stones.

During cystotomy, small stones in the urinary bladder tend to gravitate into the neck of the bladder and the proximal urethra. These will need to be removed by flushing them into the bladder using a urethral catheter. This retrograde flushing is a critical part of the surgery to remove all calculi present and leave none behind.

Preoperative preparation
After inducing general anesthesia, place the dog on its back and pass a lubricated sterile catheter into the urethra. If possible, empty the urinary bladder using the catheter, or perform cystocentesis to empty the bladder to reduce intraluminal bladder and urethral pressure. Flush the urethra with sterile saline to flush stones retrograde into the bladder. Sterile KY jelly can be mixed with the saline to lubricate the calculi and facilitate retrograde flushing. If necessary, have an assistant compress the urethra with a finger in the rectum while initially injecting saline in the catheter to help generate pressure in the urethra causing it to dilate.  Release the urethral pressure during flushing to allow stones to pass through the urethral lumen and enter the bladder. Leave the catheter in while prepping the abdomen for surgery to prevent stones from migrating back into the urethra.

Surgical Technique
Place the dog in dorsal recumbency and drape the penis in the operative field. This will allow passage of a sterile catheter during surgery and retrograde flushing after the cystotomy has been performed.

The urinary bladder is approached through the ventral abdominal midline.  An alternative in the male dog is the paramedian abdominal approach. (See: https://drstephenbirchard.blogspot.com/2014/07/cryptorchidism-in-dogs-5-ways-to-make.html) The author frequently uses this approach, especially if exploratory of the entire abdomen is not necessary.  The paramedian approach avoids incising around the prepuce and preserves preputial vessels and muscle.

After opening the abdomen, identify and exteriorize the urinary bladder and place stay sutures on the ventral aspect of the bladder. Isolate the bladder with moistened laparotomy sponges to prevent urine spillage into the abdominal cavity.  Make an incision in a relatively avascular area of the ventral bladder between the stay sutures. 

The entire bladder lumen is examined.  Excise a small sample of bladder mucosa and submit for bacterial culture. Remove calculi using a bladder spoon. (Fig. 1)
Fig. 1: Remove calculi with a bladder spoon.

 
Fig. 2: A catheter in the penile urethra is used to retrograde flush calculi
into the open bladder during cystotomy. 

Flush with sterile saline through the urethral catheter until no further stones are recovered.(Fig. 2) Multiple flushes are usually required to remove all stones, especially small ones. Be patient and thorough to be sure all calculi are removed. Also flush the bladder lumen to remove stones adhered to the mucosa.

Bladder Closure
Although the traditional urinary bladder closure is a double inverting layer  (Fig. 3), a single layer, either simple interrupted or continuous, is preferred especially in bladders that are very thickened (Fig. 4a). 
Fig. 3: Traditional 2 layer closure of the cystotomy incision. (Cushing and Lembert pattern)
 

Fig. 4a: Simple interrupted closure of a cystotomy incision. Simple continuous pattern can also be used.

With single layer bladder closure, take full thickness bites of the bladder wall but grab only a small amount of the mucosa.  Absorbable sutures are used (3-0 or 4-0 Monocryl). Leak test the bladder incision by injecting sterile saline into the bladder lumen.(Fig. 4b) Place additional sutures if leaks are found. 

Fig. 4b: Leak test of a cystotomy incision by injecting sterile saline into the bladder lumen

Lavage the bladder and surrounding area of the abdomen and perform routine abdominal closure.
Prior to recovery from anesthesia, obtain abdominal radiographs to confirm that all stones have been removed. (Figs. 5a,b)
Fig. 5a: Preoperative radiographs of a dog showing radiopaque calculi in the urinary bladder.
Fig. 5b: Immediate postoperative radiographs of same dog in Fig. 5a showing removal of all calculi.

If additional stones are seen, take the animal back to surgery to remove them.

Postoperative Care
Routine supportive care is administered postoperatively, such as intravenous fluids, analgesics, and antibiotics if necessary. Indwelling urethral catheters can be used if necessary because of urethral damage, bladder rupture, or if the bladder needs to remain decompressed for other reasons.

Long-term antibiotic therapy is prescribed if the urine or mucosal culture was positive. Always submit calculi for analysis. Further recommendations such as dietary therapy and other measures are made to prevent recurrence of stones.

References
1. David C. Grant; Tisha A. M. Harper; Stephen R. Were. Frequency of incomplete urolith removal, complications, and diagnostic imaging following cystotomy for removal of uroliths from the lower urinary tract in dogs: 128 cases (1994–2006) J Am Vet Med Assoc 2010;236:763–766

Wednesday, October 1, 2014

Scrotal Urethrostomy in Dogs: Good surgical technique makes all the difference.

Urethrostomy is the surgical procedure that creates a permanent opening between the urethral lumen and the skin, and is indicated for several disease conditions such as recurrent urinary obstruction due to calculi, trauma or neoplasia.  Urethrostomy in the dog can also be performed when penile amputation is necessary for neoplasia or other conditions, such as hypospadias.

Several types of urethrostomy have been described for dogs, but scrotal urethrostomy is currently the procedure of choice.(1-3) After castration and scrotal ablation, the urethra is opened at the level of the scrotum and sutured to the adjacent skin.

Advantages of scrotal urethrostomy are:
  • the urethrostomy stoma is located ventrally on the dog, minimizing urine scald of surrounding skin
  • the urethra is relatively close to the skin at this location
  • the scrotal portion of urethra is large enough to allow formation of a large stoma that allows passage of calculi and rarely strictures
  • urinary continence is not compromised by developing a stoma at this location.

           
Surgical Technique for Scrotal Urethrostomy

Under general anesthesia place the dog in ventral recumbency. If possible, pass a urinary catheter to flush calculi retrograde into the urinary bladder (if applicable), and leave in to help with identification of the urethra during dissection. Prepare the scrotum, ventral abdomen, and ventral perineum for aseptic surgery. Make an elliptical incision around the base of the scrotum. Be sure to leave sufficient skin to allow for a tension-free closure of skin to urethral mucosa. Perform scrotal ablation and castration in a routine fashion. (Fig. 1)  
Fig. 1: Beginning of a scrotal ablation by performing castration and scrotal ablation.
Dissect through the subcutaneous tissue and identify the retractor penis muscle. (Fig. 2) Dissect the muscle away from the urethra and retract it laterally to the urethra using forceps or a stay suture. 
Fig. 2: Dissection through the subcutaneous tissue exposing
the retractor penis muscle (black arrow), and urethra(white arrow).
Incise the urethra on the midline with a scalpel (4-6 cm opening). (Fig. 3a,b) 
Fig. 3a: Incision is made on the urethral midline with a scalpel.
The incision can be started with a scalpel and extended with fine scissors.
Fig. 3b: Completed urethral incision. Note urinary catheter in the urethral lumen.

Suture the urethral mucosa and submucosa to the skin with fine suture material (4-0 PDS or Monocryl, swaged-on taper needle) in a simple continuous pattern. (Figs. 4-9) Start the suture line at the caudal aspect of the incision, and work cranially. 
Fig. 4: Surgical model of the penis and tissue layers important for urethrostomy.
(TA = tunica albuginea)
Fig. 5: Closure of the urethrostomy begins with 2 lines of sutures at the caudal aspect of the incision.
 Place the sutures in a “3-bite” manner: urethral mucosa first, then the tunica albuginea (fibrous covering of the corpus cavernous urethra), then a split-thickness bite of the skin. This helps to close and seal the cavernous layer of tissue, preventing excessive postoperative hemorrhage. The simple continuous pattern performed in this manner drastically reduces postoperative bleeding. (2)
Fig. 6: The first line of simple continuous suture is being placed.
Note the inside out direction of the suture bites (arrow). Include small bites of
the mucosa, tunica albuginea, and skin. ("3-bite" technique)
Fig. 7: Completion of one side of the closure.

Fig. 8: Completion of both sides of the urethrostomy
Avoid excessive manipulation of the urethral mucosa since it is friable and will bleed more with trauma.
Fig. 9: Appearance of a healed scrotal urethrostomy 2 weeks postoperatively.
Postoperative Care

Typical postoperative care after scrotal urethrostomy involves prevention of incisional trauma by using an Elizabethan collar on the dog, applying petroleum jelly around the incision to keep it moist and clean, close monitoring of the incision for swelling or bruising, and general supportive care (e.g., analgesics). Light sedation with acepromazine (0.05 mg/kg, SQ or IM) can be helpful to reduce hemorrhage from the incision site which is the most common postoperative complication. Suture removal is not necessary when absorbable suture is used to close the urethrostomy. If persistent hemorrhage occurs (i.e., for several days after surgery), carefully re-assess the incision for areas where the mucosa has not properly healed to the skin.  Additional sutures in these areas to close the defect should alleviate the problem.

Postoperative urethral stricture, although a possible complication of urethral surgery, is uncommon in a well-performed scrotal urethrostomy. Stricture may occur due to chronic licking of the incision or poor apposition of the urethral mucosa to skin during closure. Treatment of stricture is to revise the urethrostomy and insure meticulous mucosa to skin closure.

References

1. Bilbrey SA, Birchard SJ, Smeak DD. Scrotal urethrostomy: A retrospective review of 38 dogs (1973 through 1988). J Am An Hosp Assoc 1991; 27: 560-564.

2. Newton JD, Smeak DD. Simple continuous closure of canine scrotal urethrostomy: Results in 20 cases. J Am An Hosp Assoc 1996; 32:531-534.

3. Collins RL, Birchard SJ, Chew DJ, Heuter KJ. Surgical treatment of urate calculi in Dalmatians: 38 cases (1980-1995). J Am Vet Med Assoc 1998; 213:833-838.