Author

Stephen J. Birchard DVM, MS, Diplomate ACVS

Friday, January 31, 2014

The Amazing Story of "Josie": Shot through the heart and survived!

October 16, 2007; a day I will never forget. I was in between surgeries and taking a break in the hallway just outside of the operating rooms at the veterinary hospital at Ohio State. I heard someone from the other end of the hall call my name, and looked up to see Dr. Bob Sherding motioning me to come look at something. He said excitedly: “You’re not going to believe this; come look at these radiographs.” Thoracic radiographs of a dog were on the view box in the treatment area. He was right, I couldn’t believe my eyes. An arrow had pierced a dog’s chest and was completely through the heart. (Figs. 1-2) 
Fig. 1: Lateral thoracic radiograph of Josie
Fig. 2: Ventrodorsal thoracic radiograph of Josie
Even more unbelievable was, the dog was alive and had just arrived at our hospital. (Fig. 3)
Fig. 3: Josie with arrow protruding from her thoracic inlet.
The dog was being treated by the emergency service. She had just been admitted and, remarkably, appeared to be in stable condition. A typical Labrador, she wagged her tail as I approached her. No arrow through the heart was going to affect the disposition of this friendly retriever. The arrow was protruding out of her thoracic inlet and was bouncing up and down in the same rhythm as her heart beat. Her vital signs were all normal, and she was alert and responsive.


We did not know her name at this point. A friend of the hunter who shot the arrow took her to Drs. Steven Sawchek and Rhonda Masterson. They immediately referred the dog to Ohio State and one of their technicians drove her there. She was a 1 year old in tact female yellow Labrador. The Ohio State students decided she should be called “Cupid” until her real name was later discovered, which was “Josie”.

Supportive care was begun on Josie and some diagnostic tests immediately performed. An echocardiogram (Fig. 4) confirmed that the arrow was indeed completely through her heart and had penetrated the right and left ventricles.
Fig. 4: Echocardiogram showing the arrow (indicated by arrows)
inside the heart.

Routine blood tests did not reveal any significant abnormalities. Josie was taken to the anesthesia prep area, placed under general anesthesia and prepped for surgery. (Fig. 5)
Fig. 5: Josie under anesthesia during the aseptic preparation of her chest cavity
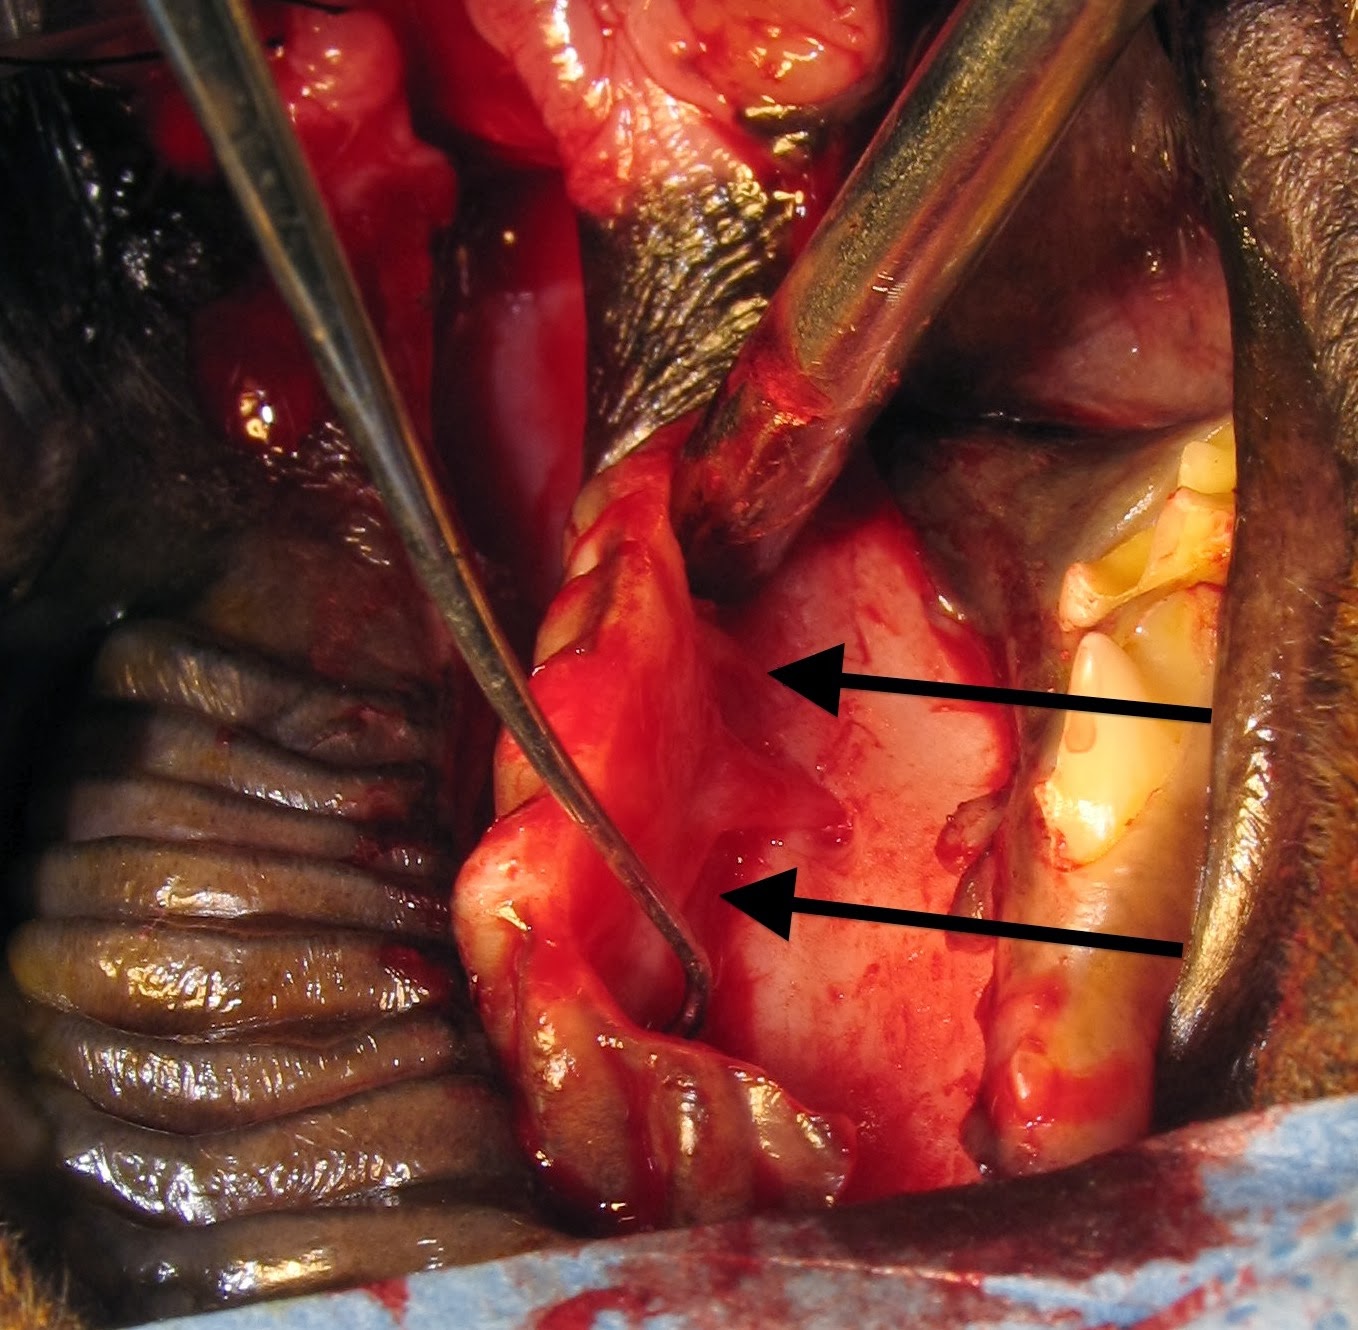
We performed a median sternotomy to allow exposure of the entire heart. (Fig. 6)
Fig. 6: Performing the sternotomy with an oscillating bone saw.
 The arrow could be clearly seen entering the right ventricle and exiting the left ventricle. (Fig. 7)
Fig. 7: Intraoperative photographic of Josie's heart. Cranial is to the left.
The arrow is seen protruding from the left ventricle (arrow)
No lung lobes had been punctured, and the tip of the arrow stopped just short of the diaphragm. There was no blood in the pleural cavity and the heart was not bleeding from the arrow punctures. The arrow was acting like a cork, sealing the heart muscle and preventing hemorrhage.

A pericardial sling was performed by opening the sac, placing stay sutures and anchoring them to the Finochietto retractor. This elevated the heart toward the sternum improving exposure. Now for the difficult part. How do we extract the arrow from the heart without causing catastrophic hemorrhage? After some quick discussion with my resident and the other doctors in the room, I decided to place a purse string suture of 3-0 PDS around the exit site of the arrow in the muscle of the left ventricle. The arrow was then backed out of the left ventricle by pulling from the cranial aspect, and the purse string was tightened as the tip of the arrow went inside the heart. A small jet of hemorrhage occurred even after tightening the suture, so an additional simple interrupted suture was placed to control the bleeding. Very little blood was lost and Josie continued to do well under anesthesia. The same suture type was placed in the right ventricle and the arrow then completely removed.

A thoracic drain tube was placed, the sternotomy closed routinely and Josie moved to ICU for recovery and further care. She was kept on a continuous ECG, her PCV monitored, and she was treated with analgesics, antibiotics, and antiarrhythmics.  She had a systolic murmur since there was a defect in the ventricular septum created by the arrow, but her cardiovascular parameters were otherwise normal.

Josie did very well and was discharged 3 days postoperatively. Two weeks after surgery she came in for suture removal. She was doing well and thoracic radiographs showed no abnormalities. (Figs. 8-9)
Fig. 8: Lateral thoracic radiograph of Josie 2 weeks postoperatively (The sternotomy was closed
with wire).
Fig. 9: Ventrodorsal view of the thorax on Josie 2 weeks postoperatively
The systolic murmur was still present however.

About 3 months after surgery Josie came back to Ohio State for ovariohysterectomy. On physical examination no abnormalities were found and no cardiac murmur was present on auscultation. A repeat echocardiogram confirmed that the ventricular septal defect had healed. I asked my student if it was ok for me to scrub in with her on this spay since this was kind of a special case. The surgery went well and Josie was discharged the following day.
Josie just before release from the hospital
I can honestly say this was the most incredible case I have ever treated.  How can a dog sustain an arrow completely through the heart and live to tell about it? I am not a hunter but I’m told that the arrow that penetrated her was a “field tip” rather than a “broad head” arrow and that’s why she survived. The tip of the arrow is the same diameter as the shaft. Thus, the shaft was able to seal the holes in the cardiac muscle and prevent hemorrhage.

I could not have successfully operated Josie without all the excellent faculty, staff, and students at Ohio State’s College of Veterinary Medicine. Drs. Shane Bateman, Rich Bednarski, and John Bonagura helped with the various aspects of her care and deserve recognition and thanks along with all the others who participated. I feel very fortunate that I was able to play a role in the care of this amazing and sweet dog.  She is the definition of a “survivor”!

Long Term Follow Up


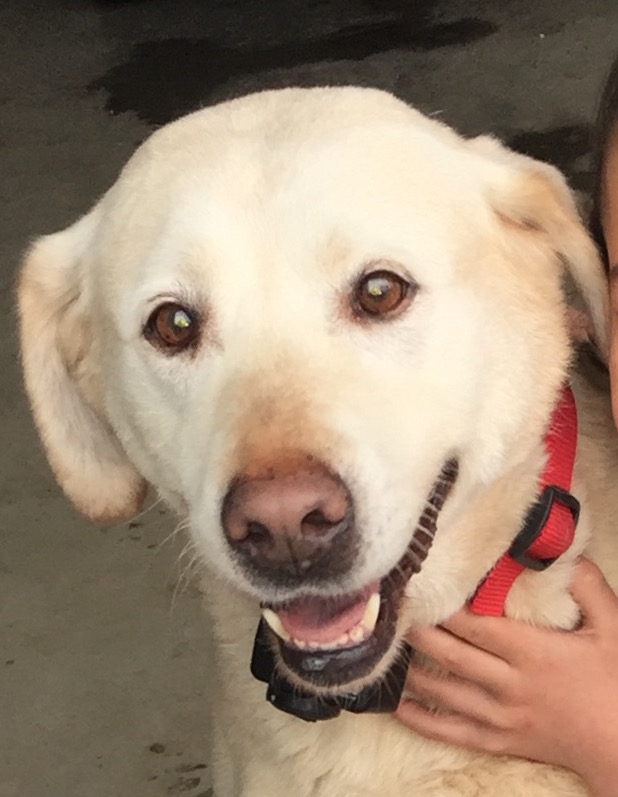
Dr. Sawchuk recently spoke with Josie's owner. She is now 10 years old and still doing well. Here is a recent picture of her. What a beautiful dog she is. 


When seriously ill pets are surrounded with love, they are more likely to survive. Read about this, and Josie's complete story, in Dr. Birchard's new book: "Their Tails Kept Wagging". Click here for more information.

Thursday, January 23, 2014

What Was The Outcome On Frank, The Golden Retriever With GDV?

This is not Frank but he's a handsome old guy, isn't he?
For those just tuning in, this is a follow up to the blog about Frank, a 9-year-old neutered male dog who presented with a GDV. The blog was posted 1/19/14.

I decided not to do a partial gastrectomy on Frank. We performed an incisional gastropexy from the pyloric antrum to the interior right abdominal wall, and closed the abdominal incision routinely. Postoperatively, besides routine supportive care with intravenous fluids and analgesics, Frank was placed on antibiotics for pyoderma and omeprazole and sucralfate for his gastritis.

Frank did well in the hospital and was discharged 2 days postoperatively. He was sent home on antibiotics for the pyoderma, Tramadol for pain (5 day course), and omeprazole and sucralfate for 1 week.  The owners were advised to feed Frank small meals several times a day and to monitor his stool for evidence of melena.

Frank was seen at our clinic 9 days postoperatively and was doing reasonably well but the owner felt he was a bit lethargic. He was eating well but only canned food.  His stools were normal. A brief abdominal ultrasound exam revealed no peritoneal fluid. The owner was advised to keep Frank on his gastric medications for another week.

Frank was again examined at our clinic 14 days postoperatively. He was more active, eating both canned and dry food, and had normal stools. His abdominal incision had healed and staples were removed. His owner was happy with his progress.

On the poll where I asked what you would do with Frank's stomach, 32 people voted and 56% choose to not do a gastrectomy. Although his stomach was severely bruised, it did not fit the most important criteria for gastric necrosis. There was not a sharp demarcation between the normal and abnormal color of the gastric serosa, but rather a gradual change from the pink to the bruised area. Also, the tissue on palpation was thick, not paper-thin which is more typical of a necrotic stomach. In addition, although I did not mention this in the original blog on Frank, the color of the affected area slightly improved after the stomach was placed into its normal position.

Please do not hesitate to post any questions you have about Frank, or GDV in general.

Sunday, January 19, 2014

Surgical Decision Needed on Frank: What should we do with his stomach?

Fig. 1: A stomach tube has been placed on Frank.

Signalment and History

Frank  is a 9-year-old castrated male golden retriever who recently presented to our clinic with a history of attempting to vomit for several hours. (Fig. 1) The owner observed that he was uncomfortable and his abdomen was distended.


Physical Examination

Physical examination revealed that Frank was ambulatory but weak and in distress. His mucous membranes were pale pink, capillary refill was > 2 seconds, and he was tachycardic. His abdomen was severely distended and tympanic on percussion.


Imaging and Emergency Treatment

Radiographs revealed a grossly distended and malpositioned stomach consistent with a gastric dilatation volvulus.(Fig. 2) 
Fig. 2: Right lateral abdominal radiograph on Frank showing classic
appearance of a GDV.
Attempts to pass a stomach tube were unsuccessful. (Fig. 1)  A gastrocentesis was performed with a 14 gauge over-the-needle catheter and gas removed. A second attempt at stomach tube passage was then successful and a copious amount of brownish fluid was obtained. Intravenous fluids were administered and Frank was prepared for emergency surgery.


Surgery

Abdominal exploratory revealed a gastric dilatation volvulus. A small amount of blood was present in the peritoneal cavity. The stomach was de-rotated and placed into normal position and the gastric tissues examined. The gastric fundus was inflamed and a portion severely bruised. (Fig. 3-4)
Fig. 3: The gastric body and part of the fundus on Frank.

Fig. 4: The gastric fundus on Frank.
The bruised area was along the greater curvature and extended to the level of the cardia. On palpation of the gastric wall the tissue was moderately thickened. No areas of perforation were seen.


Question

Should this area of stomach be resected? Or should the abnormal area be invaginated? Can this area be left alone and the dog treated postoperatively with supportive care including famotidine and sucralfate?

Select your answer on the poll on the upper right hand column of the blog website. Remember that you must view the blog in “web version” to see the poll. (It does not automatically show up on your mobile phone version.) In a few days I will let you know what I decided to do and how things turned out on Frank.

Monday, January 13, 2014

A Surgical Disaster, and How a Veterinarian and Dog Owner Saved My Career

Audubon,  New Jersey, 1977

I had graduated from veterinary school just 3 months prior to experiencing one of the darkest moments of my career. I will never forget the little sheltie that I spayed in the small animal practice in Audubon, New Jersey that I joined right out of school. I forget her real name but lets call her “Shelly”.  It was one of the first spays I had ever done. My boss, the owner of the practice, was on vacation but I was comfortable doing the surgery on my own. Heck, I had done 2 or 3 of these before; I was an expert, right? The surgery went well; Shelly recovered without any problems and was discharged the following day. The owner, a nurse, was given the usual postop instructions.

The following Monday, about 5 days after the surgery, I arrived at the clinic and I was greeted by Shelly’s owner. She was holding a cardboard box and was crying. She opened the box and there was Shelly’s dead body inside. She had chewed out her sutures, developed an evisceration, and then chewed on her own intestine. Obviously she then went into shock and quickly died.

I was devastated. Although Shelly’s owner did not blame me, she was upset and I know that in the back of her mind she wondered if this inexperienced young doctor had done something wrong to cause this catastrophe. My confidence sunk to an all time low.  What a way to start my career. I did a limited necropsy on the body and found that several of the sutures in her incision were missing or broken. The suture used for the linea alba was catgut because that’s all we had back then. Believe it or not in those days it was the suture used by most practitioners for the linea and most animals did fine. We have so many better options now, PDS being the suture of choice for most surgeons today and the dehiscence rate is much lower.

I became afraid to do surgery. In fact I was afraid to do anything that involved technical skill. I was convinced that I had fallen short of the skills necessary to perform a routine surgery and thus could not trust myself to do anything and even questioned my career choice. This experience was worse than the near disastrous splenectomy during my student surgery lab (see post on 11/3/13).

I once read an article about “imposter syndrome”. This is the condition that many people have where, regardless of their accomplishments and recognition from others, internally they think that they do not deserve their success and that they are frauds waiting to be discovered. I think I suffered from this malady for a time as a result of this surgical episode.

As I mentioned, Shelly’s owner was a nurse. She did rehabilitation therapy for cardiac patients. One of her patients was a veterinarian, Dr. Dick Klesmer. Dick practiced in Collingswood, just a few miles from where I worked. I knew Dick pretty well; he was a nice guy and an experienced and excellent vet. As Shelly’s owner was working with Dick on one of his rehab sessions she told him the story of the spay disaster. She said she had already purchased another female sheltie puppy and wanted to have him do the surgery this time when she was old enough. He suggested a different strategy. He said that she should bring the new puppy back to me for the spay. He told her I was a good doctor and for her to come back to me would help restore my confidence (assuming this time all went well!) and send the message that she did not blame me for what happened.

Amazingly, she did just that. I was shocked when she brought the puppy in but of course I tried to mask my surprise and act normally. We didn’t talk much about Shelly; just focused on the puppy and made arrangements for her spay.

It was the most nerve-racking surgery I’ve ever done. I was careful to a fault on every aspect of the surgery, especially the closure of the abdominal incision. I closed it in about 16 layers and used bridge cable on the linea alba. Then I put her in a body cast for 6 months and kept her in the hospital. Of course that’s all an exaggeration but I was really careful and did keep her in the hospital for a few days with a belly bandage on. She healed fine and everyone was satisfied with the results. My confidence and professional life were back on track.

Dr. Klesmer’s act of kindness saved my career as a surgeon and a veterinarian. I thanked him for what he did but he passed away some years later and I wished I had thanked him more. I will never forget his unselfishness and professionalism, and I will always be grateful to him. I wonder what he would say if he learned that I became a board certified veterinary surgeon and spent 27 years a surgical instructor? I will also always be grateful to Shelly’s owner for her courage in having faith in a very young, green and shaken doctor. I learned many important lessons from this experience that helped shape my career and my actions toward my colleagues.


One of my favorite quotes is an African proverb: “Smooth seas never made a skillful mariner.” What makes us better doctors are the problem cases that challenge us to learn from our mistakes. We never want bad things to happen but they are a part of life and sometimes occur regardless of our best efforts. The best thing we can do is to try to understand why, and always strive to be better. 


Thursday, January 9, 2014

8 Principles of Cleft Palate Repair in Dogs and Cats

Fig. 1: Cleft hard palate (yellow arrow) and soft palate (red arrow) in a dog.
Congenital or acquired cleft palates are seen commonly in dogs and cats. (Fig. 1) Puppies and kittens should be checked for these defects immediately after birth. Early signs of cleft palate are regurgitation of food and water into the nose. Aspiration pneumonia can develop as a consequence. Clefts can involve the lips (primary) or hard and soft palate (secondary). Most clefts require surgical repair but dehiscence is common and some cases require multiple surgeries to achieve complete closure.

Principles of cleft palate repair:

Thoroughly evaluate the animal for rhinitis and aspiration pneumonia. Treat appropriately prior to surgery.

Preserve blood supply. The major palatine artery supplies the soft tissues of the hard palate and should be kept intact whenever possible.

Handle tissues gently. Use stay sutures on edges of mucosa and flaps to avoid excessive trauma.

Use fine, absorbable sutures. I prefer 4-0 polydioxanone since it has high tensile strength, is delayed absorbable, and is monofilament.

Avoid having sutures knots in the defect.

When making mucosal flaps to repair defects, make them as large as possible to avoid tension across the incision line.

Consider some kind of implant material when local tissues are not adequate for a tension free closure. (see future blog for an example)

Use an esophagostomy or gastrostomy tube postoperatively to bypass the mouth for nutrition to avoid food accumulation on the repaired palate.

Closure Technique

For most midline cleft palate the mucoperiosteal flap technique is an effective technique for closure. 
Fig. 2: Mucoperiosteal flap repair of a cleft hard palate in a dog.  A: dotted lines indicate incisions to make the
flap and elevate the mucosa on the opposite side; B: elevating the flap from the bone with a periosteal elevator; C: the flap has been inverted and sutured in place. Inset shows the horizontal mattress suture pattern from the edge of the flap to the overlying mucosa. (from: Marretta SM. Dentistry and diseases of the oropharynx. In: Saunders Manual of Small Animal Practice, editors Birchard and Sherding, 3rd edition, Elsevier, 2006, pg 609)

(Fig. 3) A large rectangular flap is made on one side of the cleft using a scalpel and periosteal elevator and is inverted. 
Fig. 3: The flap has been elevated and is being inverted to the other side (arrows).
This flap is tucked underneath the mucosa on the other side. Again using the scalpel and periosteal elevator, the mucoperiosteal tissues are elevated from the bone on the side opposite from the flap to allow the flap to be tucked into the space between the bone and the soft tissues. Use a horizontal mattress suture pattern to close the flap over the defect. (Figs. 2 and 4)
Fig. 4: the flap has been inverted from right to left, tucked under the mucosa  and sutured. The soft palate
cleft was closed by splitting the soft tissue layer on each side with a scalpel to separate the oral mucosal
side from the nasal mucosal side and sutured in 2 layers.
The denuded bone where the mucoperiosteal flap was harvested will become covered with granulation tissue and then mucosa in a few weeks. (Fig. 5)
Fig. 5: 2 weeks postoperatively after mucoperiosteal flap repair 

Postoperative Care

Postoperatively, as mentioned in the above principles, feed the animal through an esophagostomy or gastrostomy tube to avoid food accumulation on the incision.  Recheck the patient in 10-14 days to ensure progression of normal healing.

References

Howard DR, et.al. Mucoperiosteal flap technique for cleft palate repair in dogs.
J Am Vet Med Assoc. 1974 Aug 15;165(4):352-4.


,