Author

Stephen J. Birchard DVM, MS, Diplomate ACVS

Tuesday, March 1, 2022

Reconstruction of Bilateral Caudal Maxillectomy Using an Autogenous Auricular Cartilage Graft

Stephen J. Birchard

Rebecca L. Ball


History and Physical Examination

Jack was a 4-year-old neutered male golden retriever that presented for inspiratory stertor for several weeks. (Fig. 1)

Fig. 1: Jack

There was no other history of illness. On routine physical examination, no abnormalities were identified, but oral examination under sedation revealed a 4cm diameter firm circular mass in the caudal hard palate. (Fig. 2) The mass was not movable and extended the entire width of the hard palate between the molar teeth. 
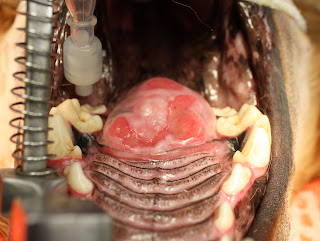

Fig. 2: Caudal hard palate mass

Diagnostic Tests

Plain film radiographs of the thorax revealed no evidence of metastasis. CT imaging of the oral cavity showed invasion of the bone of the hard palate and extension of the mass into the nasal cavity. A punch biopsy of the mass was obtained, and histopathology revealed multilobular osteochondrosarcoma.


Surgical Treatment

Under general anesthesia, the mass was excised by bilateral caudal segmental maxillectomy, including excision of the molar teeth on each side. After incising the mucosa around the mass and dorsal to the teeth, the maxillary bones and hard palate were incised with a bone burr and osteotome. The mass penetrated the hard palate but was not invasive into the nasal turbinates. The mass was excised, and bleeding was controlled with electrocautery and Vetspon in the nasal cavity. (Fig. 3)

Fig. 3: Appearance of surgical site after resection of the mass.


The large oronasal defect was closed by constructing bilateral mucosal flaps using buccal mucosa on each side of the defect and then sliding them to the midline. The flaps were closed on the midline in 2 layers: 4-0 PDS simple interrupted in the submucosa, and 4-0 PDS simple interrupted in the mucosa and sutured to the mucosa of the hard palate and soft palate in a similar manner. (Fig. 4)


Fig. 4: Oronasal defect closed by bilateral buccal mucosal flaps.

The mass was submitted for histopathology. (Fig. 5) Multilobular osteosarcoma (MLO) was confirmed, and complete resection with clean margins was reported.


Fig. 5: Tissue specimen submitted for histopathology.

Postoperative Care and Complications

Five days postoperatively, Jack presented for anorexia and a foul odor from the mouth. Oral examination revealed partial dehiscence of the rostral and caudal aspects of the buccal mucosal flaps, creating oronasal fistulae at both sites. Conservative management was initially recommended to feed soft food meatballs followed by mouth flushing with clean water. 


Surgical Revision

The rostral oronasal fistula was repaired two weeks postoperatively using an autogenous auricular cartilage graft. Under general anesthesia, a 2 cm by 3 cm rectangular section of auricular cartilage was harvested from the inner leaf of the base of the left pinna. (Fig. 6) 

Fig. 6: Red rectangle indicates the approximate size and location of the harvested auricular cartilage graft. (This is not Jack but is a dog with similar size and anatomy of the ear pinna.)


After lightly debriding and undermining the mucosa along the perimeter of the oronasal defect, the cartilage was placed in the defect with the edges inserted underneath the mucosa. The cartilage was sutured to the mucosa with 4-0 PDS simple interrupted pattern. (Fig. 7) 

Fig. 7: Closure of mucosa over cartilage graft (yellow arrow) and remaining oronasal defect (green arrow) to be repaired later.


An esophagostomy tube was placed in Jack to allow feeding while bypassing the oral cavity.


Three weeks postoperatively, Jack presented to repair the remaining defect in his palate. The cranial defect had healed well over the cartilage graft. He was doing well with only occasional difficulty drinking water. Under general anesthesia, a hinged buccal mucosal flap was performed to close the caudal oronasal fistula. (Figs. 8)


Fig. 8: Closure of hinged buccal/pharyngeal mucosal flap over remaining defect. (Arrow indicates the direction of the inverted flap.)

Follow-up

Two weeks after this final reconstruction, Jack returned for a recheck examination. On oral exam, the flap was intact and healing well. (Fig. 9)

Fig. 9: Healed defect after flap revision. 


Three months later, another recheck examination showed complete healing of all flaps and no persistent oronasal fistulae. Jack was doing well clinically with normal eating, drinking, and activity levels. 


Jack lived 6 more years after his surgery to remove the MLO. He did well during that time with no issues related to his surgery and no tumor regrowth. He eventually died of causes unrelated to the MLO. Even with a prolonged recovery and multiple revision surgeries, the owners were pleased that they had pursued the treatment of Jack’s oral tumor. 


Discussion 

Bilateral segmental maxillectomy is a surgical option for oral neoplasia of the hard palate, mainly when the tumor is on the midline. Reconstruction is by creating bilateral sliding buccal mucosal flaps that are sutured to each other on the midline over the hard palate defect.

Dehiscence is common due to the tension across the incisions and the lack of underlying bone. Reconstruction of the resultant defect is challenging due to the scarcity of available local tissue. Autogenous auricular cartilage grafts have been reported to augment the closure of oronasal defects in dogs and cats. (1,2). This technique was effective in Jack repairing one of the defects in his mucosal closure. It provided a surface for the oral mucosa to proliferate and fill the oronasal defect. The remaining defect was judged to be too large to do an additional cartilage graft but healed with a hinged buccal/pharyngeal mucosal flap. The long-term results of the reconstruction surgeries were excellent. Further clinical studies are warrented to evaluate the auricular cartilage graft technique for other oral cavity disorders such as cleft palate.  


Acknowledgment

Dr. Becky Ball was the primary surgeon in all procedures performed on Jack and directed his postoperative care. 


References


1. Soukup JW, Snyder Cj, Gengler WR. Free Auricular Autograft for Repair of an Oronasal Fistula in a Dog. J Vet Dent, Summer; 26(2): 86-95, 2009


2. Cox CL, Hunt GB, Cadier MM. Repair of Oronasal Fistulae Using Auricular Cartilage Grafts in Five Cats. Vet Surg 36:164-169, 2007.


Friday, January 21, 2022

Traumatic Tracheal Avulsion in Cats: Diagnosis and Surgical Repair


Fig. 1: 6 mo. old DSH named Tigger


 Signalment and History

Tigger is a 6-month-old male neutered Domestic Short Hair cat who was presented for repair of a fractured left femur. (Fig. 1) Tigger had been hit by a car a few days before presentation. 

Physical Examination

On physical examination, the left rear leg was moderately swollen and crepitus was evident at the midshaft femur. The cat was also mildly dyspneic with tachypnea and mildly labored breathing. Thoracic auscultation was within normal limits. 

Diagnostic Evaluation

Thoracic radiographs showed pneumomediastinum and avulsion of the thoracic trachea with air-filled mediastinum seen bridging the gap. (Fig. 2) A mid-shaft oblique femoral fracture was also found. Tigger was transferred to the ICU for continuous monitoring and oxygen therapy if necessary. 

Fig. 2a: Lateral thoracic radiograph of Tigger showing the ruptured trachea 
and mediastinal "pseudo-airway." (white arrows)

                Fig. 2b: Ventro-dorsal thoracic radiograph of Tigger.
 

Anesthesia and Surgery

Tigger was sedated and an intravenous catheter was placed. The right side of his thorax was clipped and an initial cleansing of the surgical site was performed. Anesthesia was induced with propofol and an endotracheal carefully placed. The size of the endotracheal tube was smaller than indicated to avoid further injury to the trachea. Intermittent positive pressure ventilation (IPPV) was avoided to prevent disruption of the tenuous mediastinal connection between the ends of the ruptured trachea.

The right lateral thorax was prepared for aseptic surgery. A right lateral thoracotomy was performed at the 4thintercostal space. A Buford rib retractor was placed and the cranial thorax was explored. Dissection of the trachea confirmed a complete avulsion of the trachea midway between the thoracic inlet and the carina. The mediastinum was serving as the only connection between the 2 ends of the ruptured trachea. 

The mediastinum was carefully dissected and the proximal trachea exposed. The endotracheal tube was found within the tracheal lumen, grabbed with thumb forceps, and pulled farther out. The tube was then inserted into the distal tracheal segment. IPPV was then begun and maintained for the duration of the anesthetic episode. The ends of the ruptured trachea were healthy; no debridement was necessary. The tracheal anastomosis was performed with 4-0 PDS in a simple interrupted pattern. The sutures were placed by grabbing 1-2 tracheal rings on each side of the anastomosis and were full-thickness bites from outside to inside, exiting the tracheal lumen. (Fig. 3) All sutures were pre-placed to allow accurate placement and then tied. (Fig. 4)

Fig. 3a: Surgical exposure of the trachea in Tigger after preplacing sutures across the gap. Note endotracheal tube (ET) within the tracheal lumen. 

Fig. 3b: Appearance of the trachea after completing the tracheal anastomosis.

Before closing the thorax, the endotracheal tube was gently pulled back and forth within the trachea to confirm that no sutures had penetrated the tube. A thoracic drain tube was placed and the thoracotomy closed routinely. The fractured femur was then repaired. Tigger recovered uneventfully from anesthesia. 

Postoperative Care

Tigger was returned to the ICU and given intravenous fluids and analgesics for pain. He did well overnight with stable vital signs and eupneic breathing. One day postoperatively Tigger was doing well with no dyspnea, normal vital signs, and a good appetite. Minimal amounts of air or fluid had been recovered through the thoracic drain tube so it was removed. Tigger continued to do well and was discharged from the hospital on the 2nd day postoperatively with continued analgesic therapy and instructions to keep him indoors and restrict activity. 

Tigger returned for a recheck examination 1 month postoperatively. The referring veterinarian had removed skin sutures 2 weeks after surgery and the thoracic and leg incisions were well healed. On physical examination, Tigger was bright and alert with pink mucous membranes and normal auscultation of the heart and lungs. He was weight bearing on the left rear leg. Repeat thoracic radiographs were normal with only a slight indentation of the tracheal lumen at the site of repair. (Fig. 5) Radiographs of the left femur showed normal progression of healing at the fracture site. Tigger was discharged with instructions to continue rest and return in 4 weeks for repeat radiographs of the left femur to assess continued healing.


Discussion


Tracheal avulsion in cats is rare but has been reported. (1). It is likely the result of blunt trauma that causes the head and neck to be hyperextended which stretches the trachea leads to rupture. The site of rupture is usually the thoracic trachea midway between the thoracic inlet and the carina. The airway lumen is maintained by the mediastinum resulting in a so-called “pseudo airway”, allowing the cats to continue ventilating. In one study some cats presented up to 3 weeks after the traumatic episode. (1)

Cats with tracheal avulsion present for variable signs of dyspnea. Cats with delayed diagnosis may have trachea stenosis as fibrosis occurs at each end of the ruptured segments. Removal of the stenotic tracheal rings may be necessary to facilitate an adequate lumen at the anastomosis. (2)

The anesthetic protocol for these cats is designed around providing adequate oxygen flow and ventilation without causing iatrogenic disruption of the pseudo trachea. After induction, endotracheal intubation on Tigger was performed carefully without attempting to bridge the gap with the tube which could cause more injury. IPPV was avoided until the endotracheal tube was manipulated by the surgeon to provide a secure pathway for the delivery of oxygen. Immediately after thoracotomy, the first objective was to quickly pull the endotracheal tube from the proximal tracheal segment and place it in the distal segment to allow ventilation with oxygen and anesthetic gas. The trachea could then be carefully repaired. 

Based upon our experience with Tigger and a review of the reported cases, the prognosis for cats with tracheal avulsion is good after a successful repair. Most cats show adequate healing of the airway and can go on to live a normal life. 


References

1.     R N White, C A Burton. Surgical management of intrathoracic tracheal avulsion in cats: long-term results in 9 consecutive cases. Vet Surg, Sep-Oct 2000;29(5):430-5

2.     Fingland RB. Obstructive upper airway disorders. In: Saunders Manual of Small Animal Practice, 3d edition, Birchard SJ, Sherding RG, eds., Elsevier, 2006, pg. 1663-1664.


Sunday, March 17, 2019

Colonic Volvulus in Dogs: How to fix it and prevent it from recurring.

Case Report

Addy is an 8-year-old female spayed Great Dane (Fig. 1) who presented to the MedVet Toledo emergency service for vomiting and diarrhea after eating garbage 3 days previously.  Six months previously Addy had a prophylactic gastropexy for prevention of gastric dilatation/volvulus and splenectomy to remove a benign splenic tumor.
Fig. 1: Addy, an 8 year old female spayed Great Dane with colonic volvulus.
On physical examination Addy was quiet but alert, responsive and ambulatory. Her vital signs were normal. She was approximately 5% dehydrated and was painful on abdominal palpation. Blood samples were submitted for CBC and serum chemistry profile, which were within normal limits. 

Plain film abdominal radiographs were obtained. Severe gaseous dilation of the proximal large bowel was identified, and mal-positioning of the descending colon was suspected. (Fig. 2) Based on the clinical signs and radiographic findings, a tentative diagnosis of colonic torsion was made. 
Fig 2a: Lateral radiograph of Addy showing severe dilation of the large
bowel in the cranial abdomen.


Fig. 2b: Ventrodorsal radiograph of Addy also showing severe dilation
of the large bowel in the cranial abdomen.
Emergency surgical exploration of the abdomen was recommended to the owners. Addy was placed under general anesthesia and prepared for a ventral midline abdominal exploratory. At surgery, severe dilation and malposition of the ascending colon, transverse colon, and proximal descending colon were found. (Fig. 3) The ascending colon and cecum were located on the left side of the abdomen, and the proximal descending colon located on the right side of the abdomen. Therefore a 180-degree volvulus of the proximal colon on its mesenteric axis had occurred. Although severely dilated, the colonic tissues were only mildly congested and appeared viable with no areas of necrosis.
Fig. 3: Intraoperative photo of Addy in dorsal recumbency, head is to the left.
The descending colon (DC) is malpositioned to the right side of the abdomen,
and the ascending colon (AC) is malpositioned to the left, creating a volvulus
of the transverse colon (AC).
The abnormally positioned colonic segments were replaced back to their normal positions, i.e., cecum and ascending colon back to the right side of the abdomen, and descending colon to the left side. To prevent future episodes of volvulus, a gastrocolopexy and left sided abdominal colopexy between the descending colon and interior abdominal wall were performed. The gastrocolopexy was performed by apposing the transverse colon to the greater curvature of the stomach. The serosal surfaces of the stomach and colon were scarified, and a simple continuous suture of 2-0 PDS was used to approximate the 2 structures. (Fig. 4) 
Fig. 4: Intraoperative photo of Addy after creating the gastrocolopexy (arrows)
between the transverse colon (TC) and the greater curvature of the stomach (S).
The abdominal colopexy was performed by first making a 10 cm cranial to caudal incision in the interior abdominal wall musculature. The descending colon was then scarified and placed adjacent to the abdominal incision. The dorsal edge of the abdominal incision was sutured to the seromuscular layer of the descending colon with 2-0 PDS in a simple continuous pattern, then the ventral edge of the abdominal incision was also sutured to the descending colon in a similar fashion. (Fig. 5) 
Fig. 5: Intraoperative photo of Addy after creating the colopexy (arrows)
between the descending colon (DC) and the abdominal wall (A).
The remainder of the abdomen was explored and no other abnormalities were discovered. The previously performed gastropexy between the pyloric antrum and the right interior abdominal wall appeared to be competent. 

The abdominal incision was closed routinely and Addy was recovered from anesthesia.  Addy did well postoperatively and was discharged from the hospital with analgesic medications and instructions to feed a bland diet for the next several days.  Two weeks postoperatively Addy was doing well with a good appetite and normal stools. 

Discussion
Colonic volvulus is a rarely reported disorder in dogs that is characterized by acute displacement of one or more segments of the large intestine. The disorder is also referred to as colonic torsion. However, on based previous clinical studies and the author’s clinical experience volvulus is a more accurate term to describe the condition since the transverse colon becomes twisted on its mesenteric axis. (1,2)

Although not confirmed statistically, large breed dogs appear to be more susceptible to colonic volvulus. Combining cases found in 3 retrospective studies, 30/31 of the reported dogs were large breeds. (1-3) One study also found a high incidence of previously performed gastropexy in dogs with colonic volvulus. However, this also has not been statistically proven and large breed dogs will be more likely to have had a gastropexy so the association could be coincidental. 

Clinical signs of affected dogs are acute vomiting, anorexia, and discomfort. Radiographically there is dilation of the affected colon, abnormal positioning of the large bowel, particularly the descending colon and cecum, and focal narrowing of the colon. (Ref)

The treatment of choice for colonic volvulus is immediate surgical intervention to replace the affected segments of the colon to their normal position and perform colopexy procedures to prevent recurrence of the volvulus. The gastrocolopexy is intended to stabilize the transverse and ascending colon and cecum to prevent them from flipping from right to left, and the standard descending colon colopexy to the abdominal wall prevents the descending colon from moving left to right.(For a detailed description of abdominal colopexy see: https://drstephenbirchard.blogspot.com/2019/03/how-to-perform-colopexy-in-dogs-and-cats.html.) The limited clinical reports of colonic volvulus indicate that this surgical approach is effective which is consistent with the author’s experience. 

References

1. Bentley AM1, O'Toole TE, Kowaleski MP, Casale SA, McCarthy RJ Volvulus of the colon in four dogs. J Am Vet Med Assoc. 2005 Jul 15;227(2):253-6, 236-7. 
2. Plavec T, Rupp S, Kessler M. Colonic or ileocecocolic volvulus in 13 dogs (2005-2016). Vet Surg. 2017 Aug;46(6):851-859. 
3. Gremillion CL, Savage M, Cohen EB Radiographic findings and clinical factors in dogs with surgically confirmed or presumed colonic torsion. Vet Radiol Ultrasound. 2018 May;59(3):272-278.


. 

. 

Sunday, March 3, 2019

How to Perform a Colopexy in Dogs and Cats


How to Perform A Colopexy in Dogs and Cats

Colopexy is a surgical procedure in dogs and cats intended to produce a permanent adhesion between the descending colon and the interior of the left abdominal wall. The procedure is indicated in animals with conditions such as rectal prolapse that is not responsive to other treatment methods, in selected cases of perineal hernia with rectal sacculation, and in dogs with colonic volvulus. In rectal prolapse the colopexy prevents recurrence of the prolapse since the colon is fixed to the body wall, preventing the rectum from prolapsing through the anus. In some dogs with severe rectal sacculation secondary to perineal hernia, primary herniorrhaphy may not sufficiently ameliorate the rectal pathology. Colopexy in these dogs can help straighten the rectum, reduce the size of the sacculation, and improve rectal function. Finally, colopexy can be used to prevent recurrence of colonic volvulus. Since the proximal portion of the descending colon becomes displaced to the right side of the abdominal cavity in colonic volvulus, colopexy of the descending colon to the left abdominal wall prevents that displacement and therefore prevents recurrence of the volvulus.

Surgical Technique

In the following series of step by step figures using a surgical model, colopexy of the descending colon to the interior of the left abdominal wall is demonstrated. After placing the animal under general anesthesia, the ventral abdomen is clipped and prepared for aseptic surgery. A ventral midline abdominal approach is performed. After a complete abdominal exploratory is performed, the descending colon is identified and placed adjacent to the interior of the abdominal wall at the proposed site of the pexy.

Place towel clamps on the left side of the linea alba incision and retract dorsally to better expose the interior of the abdominal wall. Make a 6-10cm (depending on the size of the animal) in the peritoneum and transversus abdominus muscle from cranial to caudal. (Fig. 1) 

Fig. 1: Make the initial incision in the abdominal wall through the peritoneum
and transversus abdominus muscle from cranial to caudal. (Cr-cranial, Ca-caudal)

The anti-mesenteric aspect of the descending colon is scarified with a scalpel to encourage a better adhesion to the abdominal wall. An incision is not made in the seromuscular layer of the colon to avoid accidental perforation of the colonic lumen.

Place the colon near the abdominal wall incision. Using gentle traction of the colon in a cranial direction, determine the optimal location of the colon on the abdominal wall to accomplish the desired goal. Suture the dorsal side of the abdominal wall incision to the seromuscular aspect of the colon in a simple continuous pattern with 2-0 PDS. (Fig. 2, 3)
Fig. 2: Suture the dorsal aspect of the abdominal wall(A) incision to the
descending colon. (DC) Note that needle direction is always from abdomen
to the colon. 
Fig. 3: Completed closure of dorsal abdominal incision to the colon.
Suture the ventral aspect of the abdominal wall incision to the colon is a similar fashion to complete the colopexy. (Fig. 4, 5)
Fig. 4: Beginning the closure of the ventral abdominal incision to the colon.
Fig. 5: Completed closure of the ventral abdominal incision to the colon. 

Postoperative Care

The abdominal incision is closed routinely and the animal is recovered from anesthesia. Supportive care consisting of intravenous fluids and analgesics is given. Monitor for postoperative pain and infection. Also monitor for normal colorectal function. Stool softeners such as Miralax or canned pumpkin can be given if constipation due to abnormally hard stool occurs. Most dogs and cats do well after colopexy with improvement of their condition and low risk of recurrence of rectal prolapse or colonic volvulus. Dogs with perineal hernia will also require primary herniorrhaphy in addition to the colopexy.

Sunday, January 20, 2019

4 Common Mistakes Made When Using Surgical Instruments

One of the most fundamental of surgical skills is proper handling of instruments. Using surgical instruments improperly can make the surgical procedure more difficult and time consuming. Here are 4 mistakes commonly made by inexperienced surgeons, and how to fix them:

1. Needle holders: the instrument is held with the thumb and 4th finger, but there is a right and wrong way to do it (it's all in the thumb!) This also applies to any forceps or scissors with ringed handles. (Fig. 1)
      Fig. 1a: Incorrect method to hold needle holders.
The thumb is inserted too far into the ring of the instrument

Figure 1b: Correct method to hold the needle holders.
For better control and smoother release of the ratchet, insert just the tip of the thumb into the ring. 


2. Thumb forceps: how the forceps are held can make a world of difference. (Figure 2)
Fig. 2a: Incorrect method of holding the thumb forceps.
This method reduces control and results in greater tissue trauma.

Fig. 2b: Correct method of holding thumb forceps for more precise control.


3. Retractors: holding them properly will avoid having the assistant's hand obscure the surgical field. (Fig. 3)
Fig. 3a: Senn retractors

Fig. 3b: Incorrect grip on the retractor.
The fingers are too close to the end of the retractor which reduces control
and obscures the surgical field.

Fig. 3c: Correct grip on the retractor.


4. Cutting suture ends after tying a knot: here's a hint, use the tips! (Fig. 4)

Fig. 4a: Incorrect method of cutting suture with Mayo scissors.

Fig. 4b: Correct method of cutting suture.
Using the scissor tips allows more precision and control.


Instrument Table Finally, arrange the instrument table as shown below. Place frequently used instruments close to the surgeons with instrument handles toward the operating table. The instrument arrangement is organized and table kept clean. Place used sponges to a back corner of the table; count sponges before and after the surgical procedure.


I hope you find these suggestions helpful. Post any questions or comments you may have on instrument handling and technique.

Tuesday, September 18, 2018

How To Repair Diaphragmatic Hernias in Dogs and Cats

 
   Introduction  
   Hernias of the diaphragm can be either congenital or acquired. Acquired hernias are most commonly due to blunt trauma to the abdomen.  Increased intra-abdominal pressure causes the diaphragm to stretch and rupture.  Liver, spleen and intestines are the organs most commonly herniated into the thoracic cavity.(1)  The muscular portion of the diaphragm, at its ventral and lateral aspects, is the most frequently torn area. Congenital hernias include the pericardial peritoneal diaphragmatic hernia (PPDH).

   Clinical Signs  
   Signs of respiratory distress, e.g., tachypnea, dyspnea, or abdominal breathing, are most common.  The animal may have a "tucked-up" appearance to the abdomen due to shifting of viscera into the pleural space.  In chronic cases, weight loss and lethargy may be the only signs the owners describe.(2) Exercise intolerance is also usually seen. In rare cases, the owner may describe signs referable to other organ systems.  For example, herniation of the intestine can cause obstruction of bowel, resulting in vomiting.  Herniation of the liver and biliary system can cause extrahepatic biliary obstruction, causing elevated serum bilirubin and icterus. 
   
   Diagnosis 
   Auscultation of the thorax reveals decreased lung sounds ventrally, and muffled heart sounds.  The thorax is dull on percussion.  Reportedly, auscultation of borborygmus in the thorax is a sign of diaphragmatic hernia, but this is not a consistent finding and should not be depended upon to make the diagnosis.
   Radiographic examination of the thorax may reveal fluid densities and/or bowel loops in the thorax. (Fig 1) Loss of continuity of the diaphragm is also seen. 
Fig. 1: Lateral thoracic radiograph of a dog with a diaphragmatic hernia and
several loops of bowel in the thoracic cavity. 
Hydrothorax may be the only radiographic sign if the liver is the only organ herniated into the thorax.  This fluid appears serosanguineous and is a transudate or modified transudate.  Ultrasonographic examination of the cranial abdomen can help confirm the hernia. 
   
   Preoperative Care  
   Diaphragmatic herniorraphy is usually considered an emergency operation. Although historically some authors advocated delaying surgical repair for several hours (3), a more recent study found that patients operated within the first 24 hours after presentation had very good outcomes (90% survival) (4). If the animal with diaphragmatic hernia does not stabilize with initial supportive care or if stomach or strangulated bowel is in the thorax the repair must be done immediately.(5) Stomach in the thorax can become dilated with air and cause life threatening hypoventilation. (Fig. 2) 
Fig. 2: Lateral thoracic radiograph of a dog with diaphragmatic hernia and stomach in the thorax cavity.
The stomach is severely dilated with air. 
If this occurs, pass a stomach tube to initially decompress the stomach If a stomach tube cannot be passed perform gastrocentesis percutaneously by placing a needle or over the needle catheter into the stomach through the chest wall.  When respiratory parameters have improved, anesthesia and surgery can then be performed.
   
   Anesthesia  
   Since these patients have markedly reduced ventilatory capacity, anesthetic induction and intubation must be rapid and smooth.  Pre-oxygenation of the patient in an oxygen cage or with an anesthetic mask is helpful to prevent hypoxia during the stress of anesthetic induction.  Rapidly acting intravenous induction agents, such as propofol, allow prompt intubation.  Begin positive pressure ventilation as soon as the endotracheal tube is placed.  Inhalant anesthetics, such as isoflurane, are acceptable for maintenance of anesthesia.
   During the clipping and prepping of the animal for surgery, the prep table can be tilted so that the head is elevated and the hindquarters lowered.  This helps prevent movement of abdominal viscera into the thorax.  
    
   Key Point: It is important to realize that when the abdominal cavity is surgically opened in an animal with diaphragmatic hernia, the animal will no longer be able to ventilate on its own. The rent in the diaphragm allows air to enter the thoracic cavity when the abdomen is open, eliminating the negative intrathoracic pressure that is necessary for normal ventilation. Intermittent positive pressure ventilation (IPPV) is therefore necessary during the surgical repair of the diaphragm. 
   
   Surgery 
   The ventral midline abdominal approach is indicated for most diaphragmatic hernias. (Fig. 3) 
Fig. 3: Intraoperative appearance of a left diaphragmatic hernia
exposed via a ventral midline abdominal approach.
(arrows indicate edges of the ruptured diaphragm).
The liver is present in the thoracic cavity.
Balfour retractors and large malleable retractors facilitate the exposure.  Grasping the edges of the diaphramatic defect with Babcock forceps or stay sutures can help in closure of the defect.  In many cases, the diaphragmatic defect must be enlarged to allow the viscera to be pulled back (reduced) into the abdomen.  When enlarging the defect, be sure to make the diaphragmatic incision in an accessible portion of the diaphragm to simplify closure. Chronic hernias may be associated with adhesions between the herniated organs and the lungs or mediastinum.(2) Break these down carefully to avoid injury to lung or other organs.  After reducing herniated organs back to the abdominal cavity carefully examine the lungs for evidence of atelectasis.  If atelectasis is found it is best not to acutely re-expand those lung lobes since re-expansion pulmonary edema can occur.  This is especially true in chronic hernias.  Place a thoracic drain tube before closure of the diaphragm to allow for re-establishment of negative pressure in the pleural space once the diaphragmic rent is repaired.  
   A variety of techniques for herniorrhaphy have been described.  The author prefers a continuous suture pattern using 2-0 or 3-0 PDS depending on patient size. Suturing is begun at the most inaccessible area of the defect (usually the dorsal aspect) progressing to the most accessible.(Fig 4) 
Fig. 4: Same dog as in figure 3 after suture closure of the diaphragmatic hernia.
Be very careful when working around the central part of the diaphragm because of the caudal vena cava.  Take care to not make the closure too tight around the caval hiatus.  Incorporation of the ribs with the soft tissues during suturing is sometimes necessary for those hernias that occur along the costal arch.
   In rare cases there is not enough diaphragmatic tissue to permit primary closure.  For example, chronic hernias in which the diaphragmatic tissue tears directly off the costal arch or dorsally from the spine.  In these cases reconstruction of the defect with a mesh implant such as Marlex mesh can be used.  The mesh is sutured in place with non-absorbable sutures such as monofilament polypropylene.  Prophylactic antibiotics are indicated in these cases.
   Once closure of the diaphragm is completed, remove residual air from the thorax.  This can be done either directly through the diaphragm using a needle or over the needle catheter or by placing a thoracostomy tube. When postoperative pneumothorax is a potential problem, such as those cases with lung adhesions, an indwelling thoracic drain tube should be placed and left in for as long as necessary to ensure stable negative intrapleural pressure. As previously mentioned in animals with chronic hernias and lung atelectasis, slowly evacuate the air in the pleural space over several hours to prevent re-expansion pulmonary edema. 
   
   Postoperative Care 
   Close observation of the patient is mandatory postoperatively.  If available the patient is kept in an oxygen cage until recovered.  In most cases recovery is unremarkable.  Acute, severe pulmonary edema can occur in some animals postoperatively and must be treated aggressively using diuretics, oxygen, and assisted ventilation.  In general the prognosis for postoperative survival is very good for patients with either acute or chronic diaphragmatic hernias. (2,4)
   
   References
1. Wilson GP, Newton CD, Burt JK. A review of 116 diaphragmatic hernias in dogs and cats. J Am Vet Med Assoc 1971; 159:1142-1145
2. Minihan AC, Berg J, Evans KL. Chronic diaphragmatic hernia in 34 dogs and 16 cats.
J Am Anim Hosp Assoc. 2004 Jan-Feb;40(1):51-63. 
3. Boudrieau RJ: Pathophysiology of Traumatic Diaphragmatic Hernia, in Bojrab MJ (ED): Disease Mechanisms in  Small Animal Surgery, ed 2. Philadelphia, Lea & Febiger, 1993, pgs 103–108
4. Gibson TW1, Brisson BA, Sears W. Perioperative survival rates after surgery for diaphragmatic hernia in dogs and cats: 92 cases (1990-2002).J Am Vet Med Assoc. 2005 Jul 1;227(1):105-9.
5.Bjorling DE. Thoracic Trauma, in Birchard SJ, Sherding RG, ed. Saunders Manual of Small Animal Practice. St. Louis, Elsevier, 2006, pgs. 1721-1722.


Thursday, May 31, 2018

Do Lawn Treatment Chemicals Cause Cancer in Pets? A growing body of research says yes!


Cancer is one of the most important health issues affecting household pets. Causes of cancer are many and varied, including genetic predispositions, certain viruses, and exposure to environmental toxins. Many studies in both humans and animals have focused on the increased risk of cancer from chronic use of chemicals such as pesticides and herbicides around the household.  Since dogs and cats have significant exposure to grassy areas of properties, lawn chemicals in particular have been studied for the potential of causing health problems.

Several studies have now shown an association between the frequently used chemicals on household lawns and cancer in dogs.(1-4) Dogs chronically exposed to the herbicides and pesticides in lawn sprays and granules are more likely to get cancers such as lymphoma and transitional cell carcinoma of the urinary bladder. An initial study published in the Journal of the National Cancer Institute in 1991 found that homeowners that frequently used the herbicide 2,4- dichlorophenoxyacetic acid on their lawn had a statistically significant higher rate of lymphosarcoma in their dogs.(1) Lymphosarcoma, also called malignant lymphoma, is a common cancer affecting lymph nodes and other organs and lymphatic tissues. This study was heavily criticized by other investigators who questioned the validity of the results. However, a more recent study published in 2012 analyzed 263 dogs with lymphosarcoma and found a 70% increase in risk of the cancer in households with professionally applied pesticides on the lawns.(2)

Two studies at Purdue University College of Veterinary Medicine have also found disturbing results of dogs exposed to herbicides, particularly the phenoxy herbicides such as the previously mentioned 2,4- dichlorophenoxyacetic acid, also called 2,4-D.(3,4) 

Herbicides were found in the urine of 76% of dogs from households that used them on their lawn.(4) The herbicides were also found in the urine of some dogs from households where the herbicide was not used, indicating they were exposed to them in areas other than their own property. 

The additional study from Purdue found that Scottish Terriers living in households that used herbicides alone or herbicides and pesticides on their lawns were markedly more prone to transitional cell carcinoma of the urinary bladder.(3) This study, along with the former one looking at the chemicals being present in the urine, are convincing evidence that the herbicide exposure is directly related to bladder cancer in this breed. Other breeds could be examined in the future to further define the risks of exposure. 

More research is needed to elaborate the dangers of lawn chemicals to our pets, but these well designed and executed studies make it clear that the commonly used pesticides and herbicides being indiscriminately sprayed and broadcast on our lawns are causing cancer in dogs. Many provinces in Canada have completely banned what they call “cosmetic” use of herbicides and pesticides because of the potential health problems. Cosmetic is a good term because the cancer causing chemicals are being used merely to improve the appearance of our lawns. Maybe we should be more tolerant of less than perfect grass if it decreases the adverse health effects on our pets. 

Although additional studies will help to better define the problem, we now have sufficient evidence to raise serious concerns about the dangers of herbicides and pesticides used on lawns. Homeowners should be educated about these issues so that they can take appropriate action to protect their pets from harm. Professional lawn care companies also need to carefully consider their protocols and make necessary changes to stop contaminating the environment with chemicals that are now proven to be carcinogenic to pets. 

References

1. Hayes HM1, Tarone RE, Cantor KP, Jessen CR, McCurnin DM, Richardson RC. Case-control study of canine malignant lymphoma: positive association with dog owner's use of 2,4- dichlorophenoxyacetic acid herbicides. J Natl Cancer Inst. 1991 Sep 4;83(17):1226-31. 

2. Biki B. Takashima-Uebelhoer, Lisa G. Barber, Sofija E. Zagarins, Elizabeth Procter- 
Gray, Audra L. Gollenberg, Antony S. Moore, and Elizabeth R. Bertone-Johnson. Household Chemical Exposures and the Risk of Canine Malignant Lymphoma, a Model for Human Non-Hodgkin’s Lymphoma. Environ Res. 2012 January ; 112: 171–176. 

3. Glickman LT1, Raghavan M, Knapp DW, Bonney PL, Dawson MHJ. Herbicide exposure and the risk of transitional cell carcinoma of the urinary bladder in Scottish Terriers. J Am Vet Med Assoc. 2004 Apr 15;224(8):1290-7. 

4. Knapp DW1, Peer WA, Conteh A, Diggs AR, Cooper BR, Glickman NW, Bonney PL, Stewart JC, Glickman LT, Murphy AS. Detection of herbicides in the urine of pet dogs following home lawn chemical application. Sci Total Environ. 2013 Jul 1;456-457:34-41.