Author

Stephen J. Birchard DVM, MS, Diplomate ACVS
Showing posts with label Wound management. Show all posts

Saturday, March 28, 2026

Demystifying Bandage Selection for Wounds in Dogs and Cats

In treating open skin wounds in small animals, one of the most important decisions you make is bandage selection. It’s easy to think of bandaging as a routine step after wound preparation, but in reality, the bandage plays an active role in how the wound heals. The right bandage can help debride, control infection, manage exudate, and protect developing tissue. The wrong bandage — or the right bandage used at the wrong time — can delay healing and create new problems.

Over the years, I’ve found that many clinicians don’t struggle with the concept of wound management as much as they struggle with choosing the most appropriate bandage for the situation at hand. There are many options available, and it’s not always obvious which one to use — especially in the early stages of wound care.

The goal of this post (Part 1) is to provide a simple, practical reference to commonly used bandage types for open wounds. This is not meant to be exhaustive, but rather a guide you can quickly review and apply in everyday practice. Stay tuned for Part 2 which will address in which wound phase to use these bandage types. 

Table: Bandage Types and Indications

Wet-to-Dry Bandage – Adherent, provides mechanical debridement of necrotic tissue; used in contaminated or necrotic wounds early in management. 

Tie-Over Bandage – Provides a stable dressing in difficult locations such as the axilla, groin, and head; useful for a variety of bandage primary layers. (See here for more information)

Non-Adherent Contact Layer (e.g., Adaptic Touch) – Protects granulation tissue; used for fresh wounds not needing debridement, graft beds, and partial-thickness injuries. (See here for more information)

Sugar or Honey Dressings – Bactericidal, absorbent, non-adherent; used in infected wounds to reduce bacterial load and support early granulation. (See here for more information)


Petroleum-Impregnated Gauze – Non-adherent, used on well developed granulation tissue that is clean and not infected. (See here for more information)


Telfa Pad – Non-adherent, minimally absorbent; used for free skin grafts or closed incisions (not used on open wounds).

Topical Antibiotic Ointment – Protect closed incisions and small superficial wounds; not a substitute for systemic therapy in deep infections.

Successful wound management depends not only on choosing the right bandage, but on understanding what that bandage is meant to accomplish. Each layer has a purpose, and using them thoughtfully can make the difference between delayed healing and an efficient, uncomplicated recovery.

In Part 2, we’ll take the next step—matching bandage selection to the phase of wound healing, so you can make practical, case-based decisions in real time.

The concepts and tables presented here are adapted from our upcoming textbook on small animal soft tissue surgery, currently in development as a practical, quick-reference resource for clinicians.


Sunday, February 19, 2023

Adaptic Touch: The Ideal Dressing For Open Skin Wounds in Dogs and Cats

When managing open skin wounds in dogs and cats, bandaging materials and techniques are critical elements of the treatment strategy. The interior of the bandage in contact with the wound is called the primary layer and is the most important of the dressing for creating a suitable environment for healing. Many options for the primary bandage layer are available, including wet saline sponges, dry sponges, silicone dressings, medical-grade honey gauze, petroleum-impregnated gauze, and Telfa pads. The ideal first layer of the bandage should encourage granulation tissue formation. It should not inhibit healing cells and not promote infection. The primary layer should allow absorption of wound exudate into the second layer of the bandage to prevent accumulation at the wound surface.  


Telfa pads have historically been used for open wounds in animals, but newer materials that allow better absorption of exudate from the wound are available. Wet saline sponges are commonly used as the initial primary bandage layer in acute traumatic wounds because they are highly absorptive, allow gentle debridement of dead tissue, and are inexpensive. However, when saline sponges become dry, they are adherent, making bandage changes painful. Patient sedation is frequently necessary to prevent discomfort during removal. Lavage of the dried sponges with sterile saline during bandage change will allow them to be peeled off the wound more easily and with less pain. Although wet saline sponges are very effective in initially managing severe wounds, such as bite wounds in dogs and cats, a primary bandage layer is needed for the next healing phase. Ideally, this material should allow absorption of wound exudate and be non-adherent to reduce patient discomfort. 


Vitalitymedical.com


The Adaptic Touch is an excellent choice for the primary bandage layer on open wounds in dogs and cats. It is a soft and pliable silicone-coated mesh material that readily conforms to the wound surface. The pore size in the mesh is small enough to prevent the ingrowth of granulation tissue into the material. The Adaptic Touch mesh allows the passage of wound exudate into the secondary bandage layer and is non-adherent, minimizing patient discomfort during bandage changes. It has been used extensively for various human wounds and is gaining favor with veterinarians. Cotton is a good choice for the secondary layer of the Adaptic Touch bandage allowing for the transmission of fluid through the pores of the mesh. Use only one layer of the Adaptic to ensure adequate absorption into the cotton.


The original Adaptic mesh is a petroleum-impregnated gauze that allows absorption and is non-adherent. However, petroleum may have some detrimental effects on wound healing, and it is only partially non-adherent. These characteristics make them less ideal than their counterpart, the Adaptic Touch.


See the above video for a demonstration of the non-adherent nature of the Adaptic Touch dressing. 


In summary, the ideal bandages for open skin wounds in dogs and cats have primary layers that allow absorption of wound exudate, are non-adherent, and do not inhibit wound healing. For wounds that are highly contaminated and filled with dirt and debris that cannot be entirely removed by surgical debridement and flushing, moist saline sponges are indicated as the initial bandage. Since these bandages are adherent and painful to remove, transition to non-adherent dressings such as the Adaptic Touch is recommended for the next phase of wound treatment.


References

International case series: Using ADAPTIC TOUCH® Non-Adhering Silicone Dressing: Case Studies. London: Wounds International, 2013. 

Wounds International case studies evaluation. ADAPTIC TOUCHTM Non-Adhering Silicone Dressing in skin tear management. Wounds International, 2018 (Suppl). Cooper 

Janice Bianchi*, Simon Barrett, Fania Pagnamenta, Fiona Russell, Sandra Stringfellow, Pam
Cooper. Consensus guidance for the use of Adaptic Touch non-adherent dressing. Wounds UK, 2011, Vol 7, No 3 
 

When surrounded with love, seriously ill pets are more likely to survive. Read about this in Dr. Birchard's new book. Click here for more information.


Tuesday, June 28, 2022

Medical and Surgical Treatment of Severe Thermal Burns in a Cat


Signalment and Presentation

Maximus, a healthy 6-month-old mixed breed neutered male cat, was presented for severe thermal burns over large areas of his body after jumping into a bathtub filled with scalding hot water.  The injury occurred just a few hours before presentation.


On admission, Maximus was tachycardic and severely painful. All four paws were red, swollen, and bleeding. The skin on his ventral abdomen and thorax was bright red and bruised. It appeared that the injury affected about 50% of his body. There was no other previous history of medical problems.


Initial Treatment

Maximus was initially administered intravenous fluids, antibiotics, and buprenorphine for pain. Continuous intravenous infusion of fentanyl was added to the treatment regimen soon after admission. Blood tests showed evidence of dehydration and elevated serum potassium. Silver sulfadiazine was used as the topical cream medication on the burned areas.


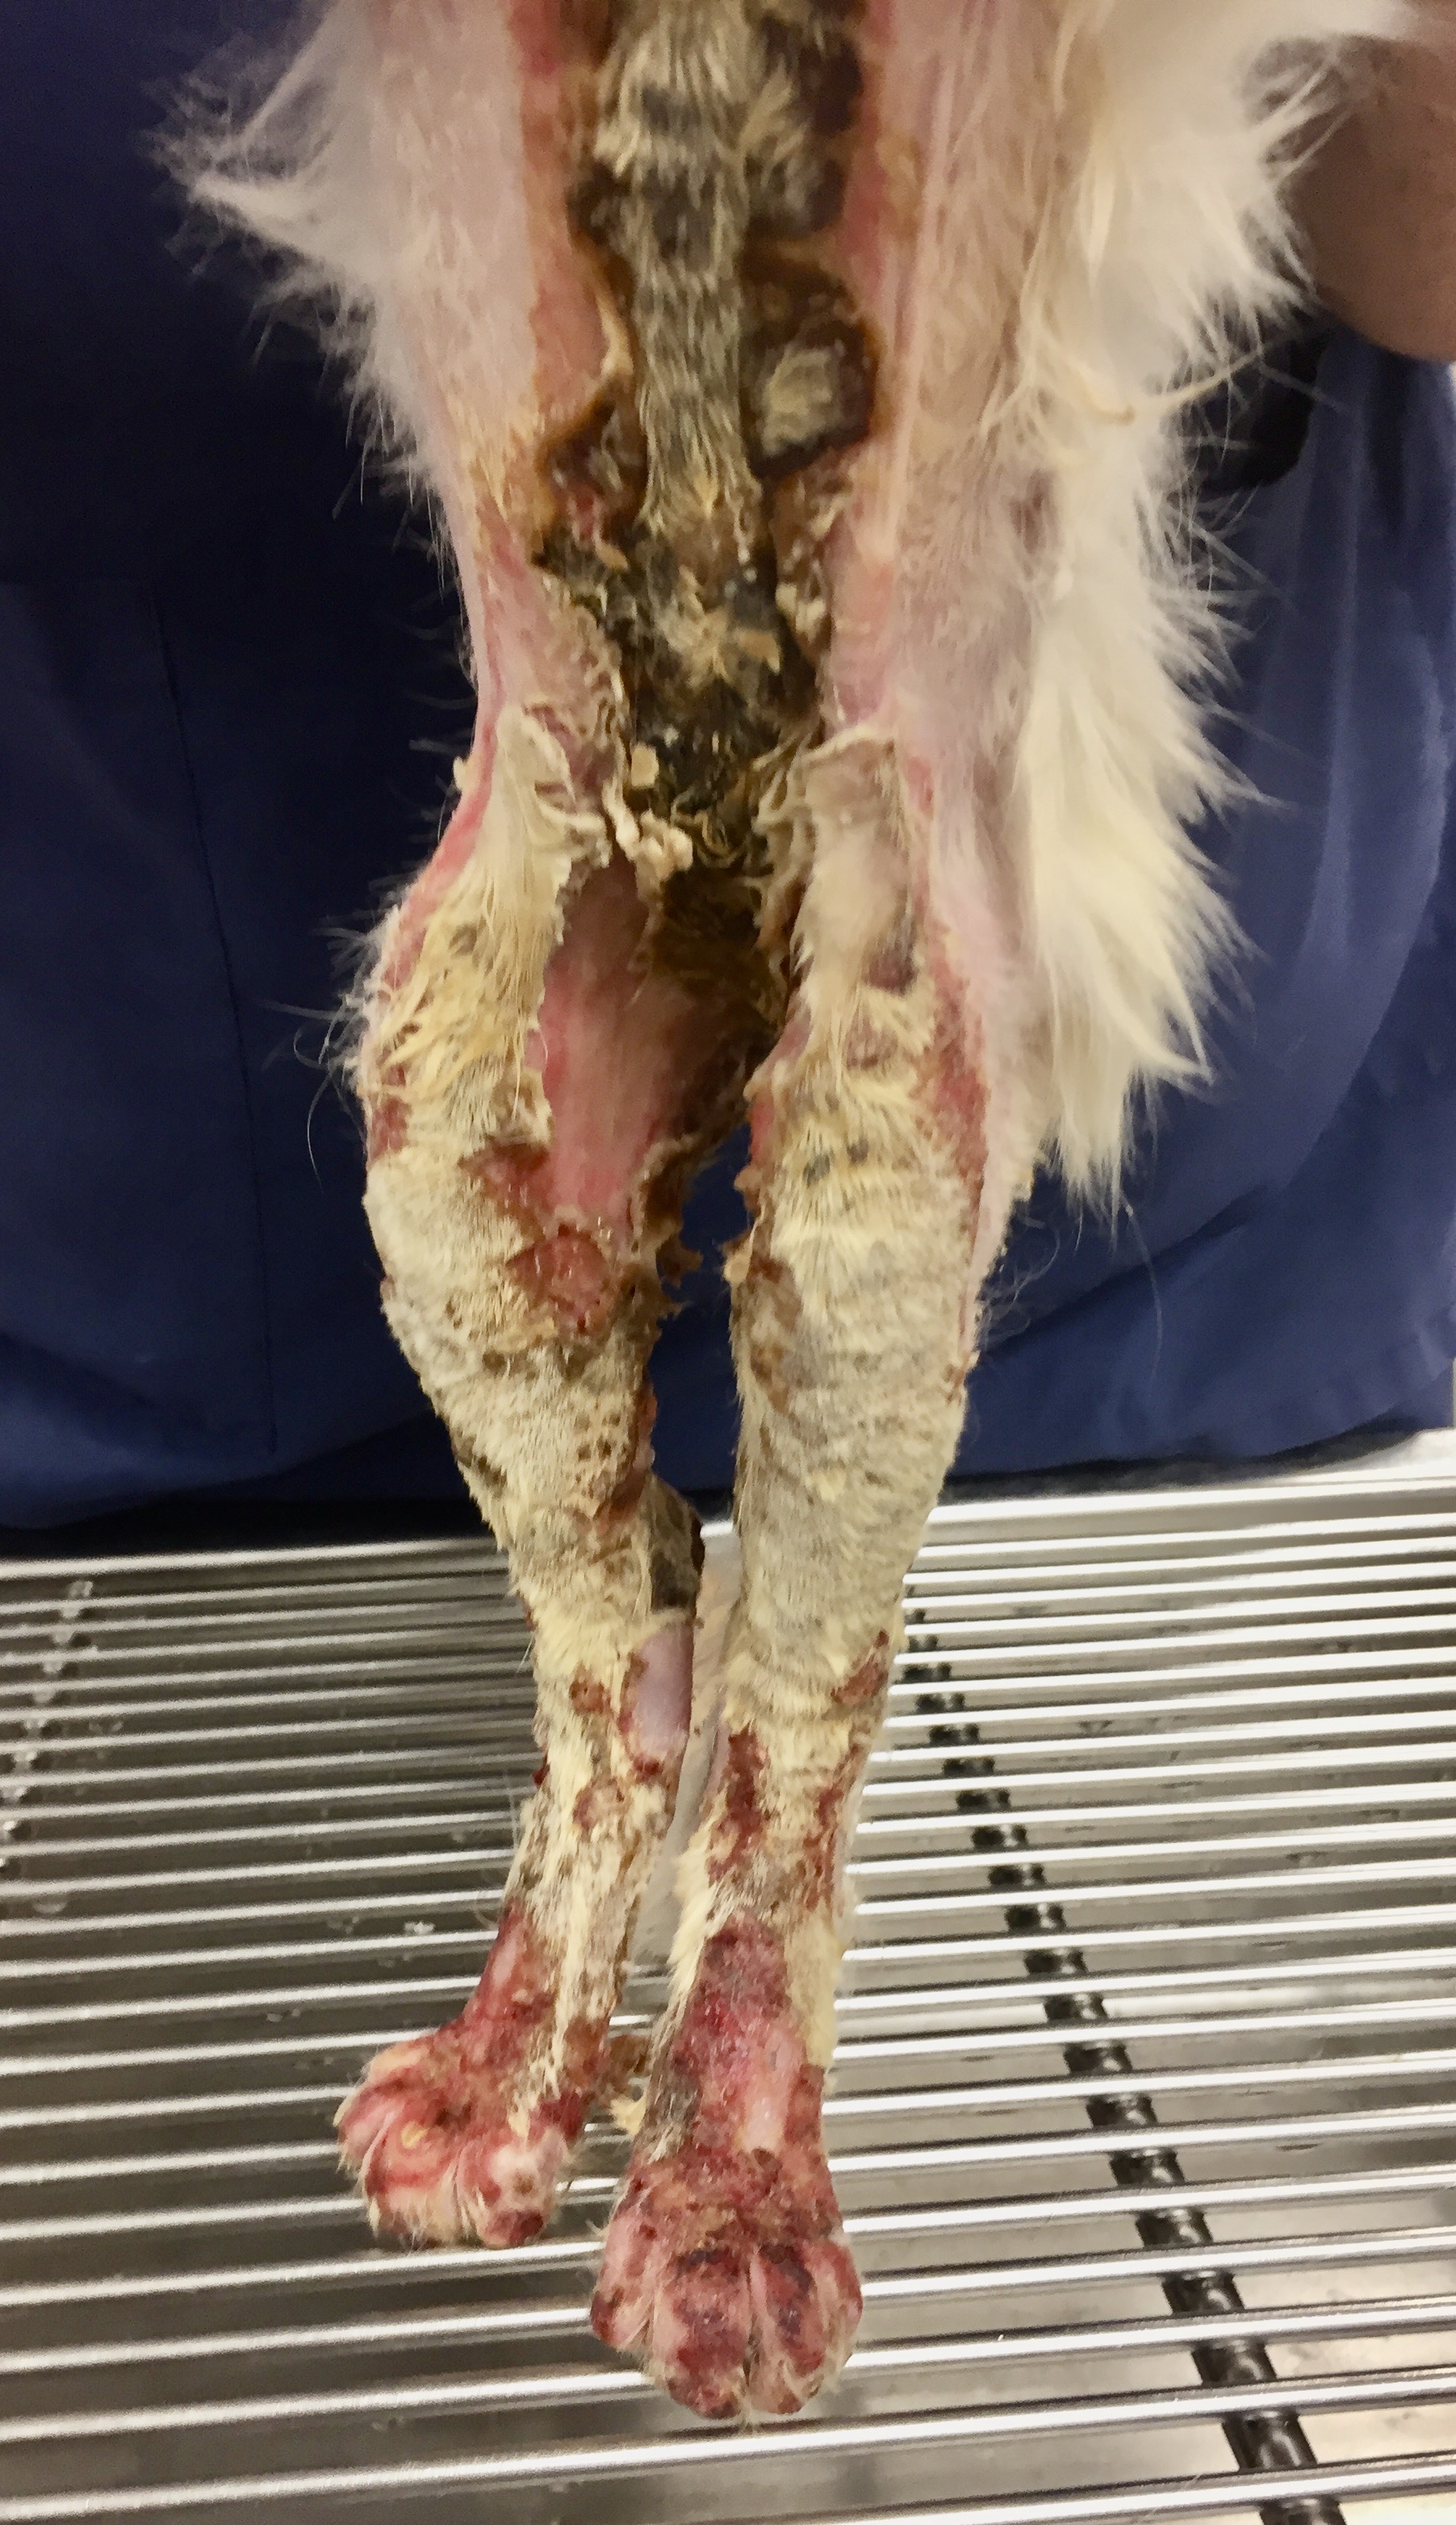
Maximus was non-ambulatory because the skin of his footpads was peeling off, leaving subcutaneous tissue exposed. Over the next several hours, the burned areas on his legs, chest, and belly gradually became purple in color. Some of the burned skin on his chest was becoming hard and leathery. (Fig. 1a,b) On a pain scale from 1-24 (1 being little or no pain, 24 being the worst pain possible), the attending clinician listed Maximus as 24. Intravenous lidocaine and ketamine were added to the fentanyl infusion to provide more analgesia. The dosage of fentanyl was also increased.

Fig. 1a: Maximus several hours after admission to the hospital

Fig. 1b


After sedating him with intravenous propofol, all of Maximus’ burned areas were carefully clipped and cleaned. With the hair removed, the burned regions were more clearly visible; the total surface area of his burned body appeared to be closer to 60%. 


More blood tests showed that Maximus’ albumin was already below normal. Albumin was being depleted because of the severe inflammation of the damaged skin and loss of albumin-rich fluid that oozed from his wounds. A nasogastric tube was placed to augment his dietary intake. 


Wound Management

On day two after admission, Manuka honey (Medihoney) was begun as the topical medication on the wounds, and standard bandaging was continued. The burned areas were gradually declaring themselves, and on day 4, some were starting to turn yellowish-brown and becoming hard and crusty. Escars were developing, indicating full-thickness skin injury. (Fig. 2)

Fig. 2: Escar development over mid abdomen and rear legs


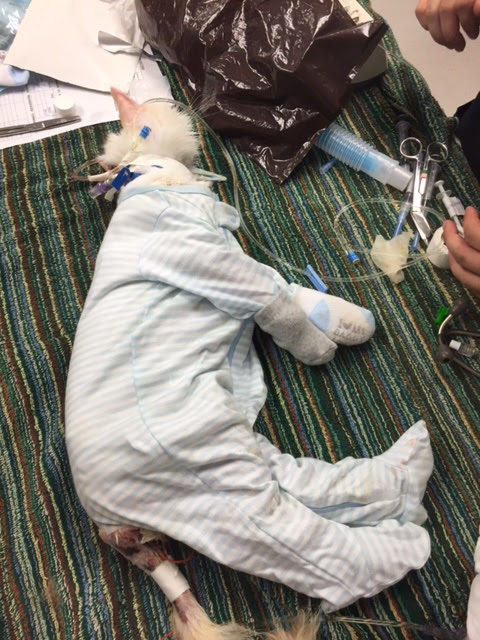
To simplify the bandage changes that were time-consuming and painful, the attending clinician Dr. Becky Ball began covering Maximus with infant onesies, little pajama outfits that completely covered the entire body, legs, and feet. (Fig. 3) Each day the onesie was removed, the wounds gently cleaned, Medihoney ointment applied, and a clean onesie replaced. 

Fig. 3: Onesie pajama bandage applied.


Maximus was discharged 12 days after admission. The owner, a physician, assumed the nursing care at home. Rechecks with Dr. Ball were scheduled every 4-5 days for wound assessment. The escars gradually peeled away from the healthy skin, exposing new granulation tissue underneath. No evidence of infection was seen, and Maximus' appetite was good. 


Maximus continued to be re-examined about every two weeks. The eschars completely sloughed off, and the skin defects were contracting and closing well. But, as the skin tightened in his inguinal region, scar tissue pulled his rear legs medially, severely restricting his mobility. (Fig. 4) Surgery would be necessary to alleviate the contracture and allow Maximus to use the hind legs better. 

Fig. 4: Wound contraction of inguinal skin.

Skin Reconstruction


Seven months after Maximus’ injury, a caudal superficial epigastric axial pattern skin flap was performed to alleviate the inguinal wound contracture. (Fig. 5a-b) Click here for a detailed description of the skin flap procedure. The surgery went well, and he was discharged from the hospital the following day.

Fig. 5a: Axial pattern skin flap design. Arrow indicates the direction of rotation of the flap after it is dissected out.

Fig. 5b: Completed skin flap procedure.


Seven days postoperatively, suture removal was performed. The skin flap was viable and had healed well to adjacent skin. Maximus was much more mobile and less painful. Seven months postoperatively, he was examined again and was doing well with all wounds healed and his function back to normal. (Fig. 6, 7)

Fig. 6: Appearance of inguinal area seven months after skin flap reconstruction.

Fig. 7: Maximus and his owner 15 months after his injury.


Discussion


Maximus overcame a severe injury with burns over a large portion of his body. He exemplifies the remarkable wound healing process, particularly when supported with good nursing care. Manuka honey was effective in preventing infection and encouraging wound healing. Dietary support was instrumental in avoiding hypoproteinemia and malnutrition. Excessive wound contracture necessitated skin flap reconstruction, improving mobility and relieving chronic pain. 


Maximus' owner, a neonatologist, was instrumental in his recovery. She assumed the challenging nursing care at home and was diligent in the tedious work of medicating, bandaging, and maintaining good hygiene.


Maximus’ complete story is told in Dr. Birchard’s book: Their Tails Kept Wagging: Pets Show Us How Hope, Forgiveness, and Love Prevail, a collection of inspirational stories of severely ill pets who survived due to modern medicine and compassionate caregivers. For more information, click here.


Saturday, April 21, 2018

Axial Pattern Flap Reconstruction of a Chronic Non-Healing Elbow Wound in a Golden Retriever

Ginger is a 7-year-old female spayed golden retriever who presented to MedVet Toledo with a chronic non-healing open skin wound over the right elbow. (Fig. 1) 

Fig. 1: Ginger
The owner adopted Ginger 1.5 years prior to presentation and the wound was present at that time. Ginger was otherwise healthy with no major medical issues. Serous fluid drained from the wound occasionally. Antibiotic therapy previously prescribed did not result in significant improvement of the wound.

Physical examination of Ginger was normal except for a large (8cm diameter) open wound over the right elbow that appeared to be a decubital ulcer. (Fig. 2) 
Fig. 2: The non-healing chronic open wound over the right elbow on Ginger
Extensive fibrotic scar tissue was present around the periphery of the circular wound, and unhealthy granulation tissue was seen in the wound center. Little to no discharge was present on the wound surface.

A fine needle aspirate of the peripheral scar tissue was performed to rule out neoplasia and the cytology results indicated chronic inflammation. Routine preoperative CBC and serum chemistry profile were normal. The plan was to anesthetize Ginger, perform an extensive surgical debridement of the fibrotic peripheral tissues, and reconstruct the skin using an axial pattern skin flap. 

Ginger was anesthetized and the right elbow and surrounding skin clipped and prepared for aseptic surgery. The donut shaped abnormal scar tissue was removed using blunt and sharp dissection. (Fig. 3) 
Fig. 3: The right elbow of Ginger immediately after surgical debridement of the chronic wound. 
During this dissection it became clear that the tissue was highly vascularized. Hemostasis was difficult and bleeding became brisk throughout the dissected area. The hemorrhage was controlled with electrocautery and direct pressure. We elected to delay the skin flap reconstruction so that open wound management with tie-over bandages could be used on the elbow to allow the debrided area to be in more optimal condition for the definitive reconstruction procedure. (for more information see: tie-over bandages)

One week after the surgical debridement Ginger was re-admitted to the hospital for the skin flap procedure. Ginger was placed under general anesthesia and a thoracodorsal axial pattern skin flap was performed to reconstruct the elbow decubitalulcer. (Fig. 4)
(for more information see: axial pattern skin flaps) 
Fig. 4: Completed thoracodorsal axial pattern flap reconstruction of the elbow on Ginger.
White arrow indicates direction of transfer of the rectangular skin flap harvested from skin over the scapula.
Complete coverage of the wound was achieved with the skin flap. A spica bandage was placed over the leg and thorax to protect the incisions and Ginger was recovered from anesthesia. 

The following day Ginger’s bandage was changed and she was discharged from the hospital. Bandage changes occurred every 2-3 days until the incisions were healed and staples removed. (Fig. 5) 
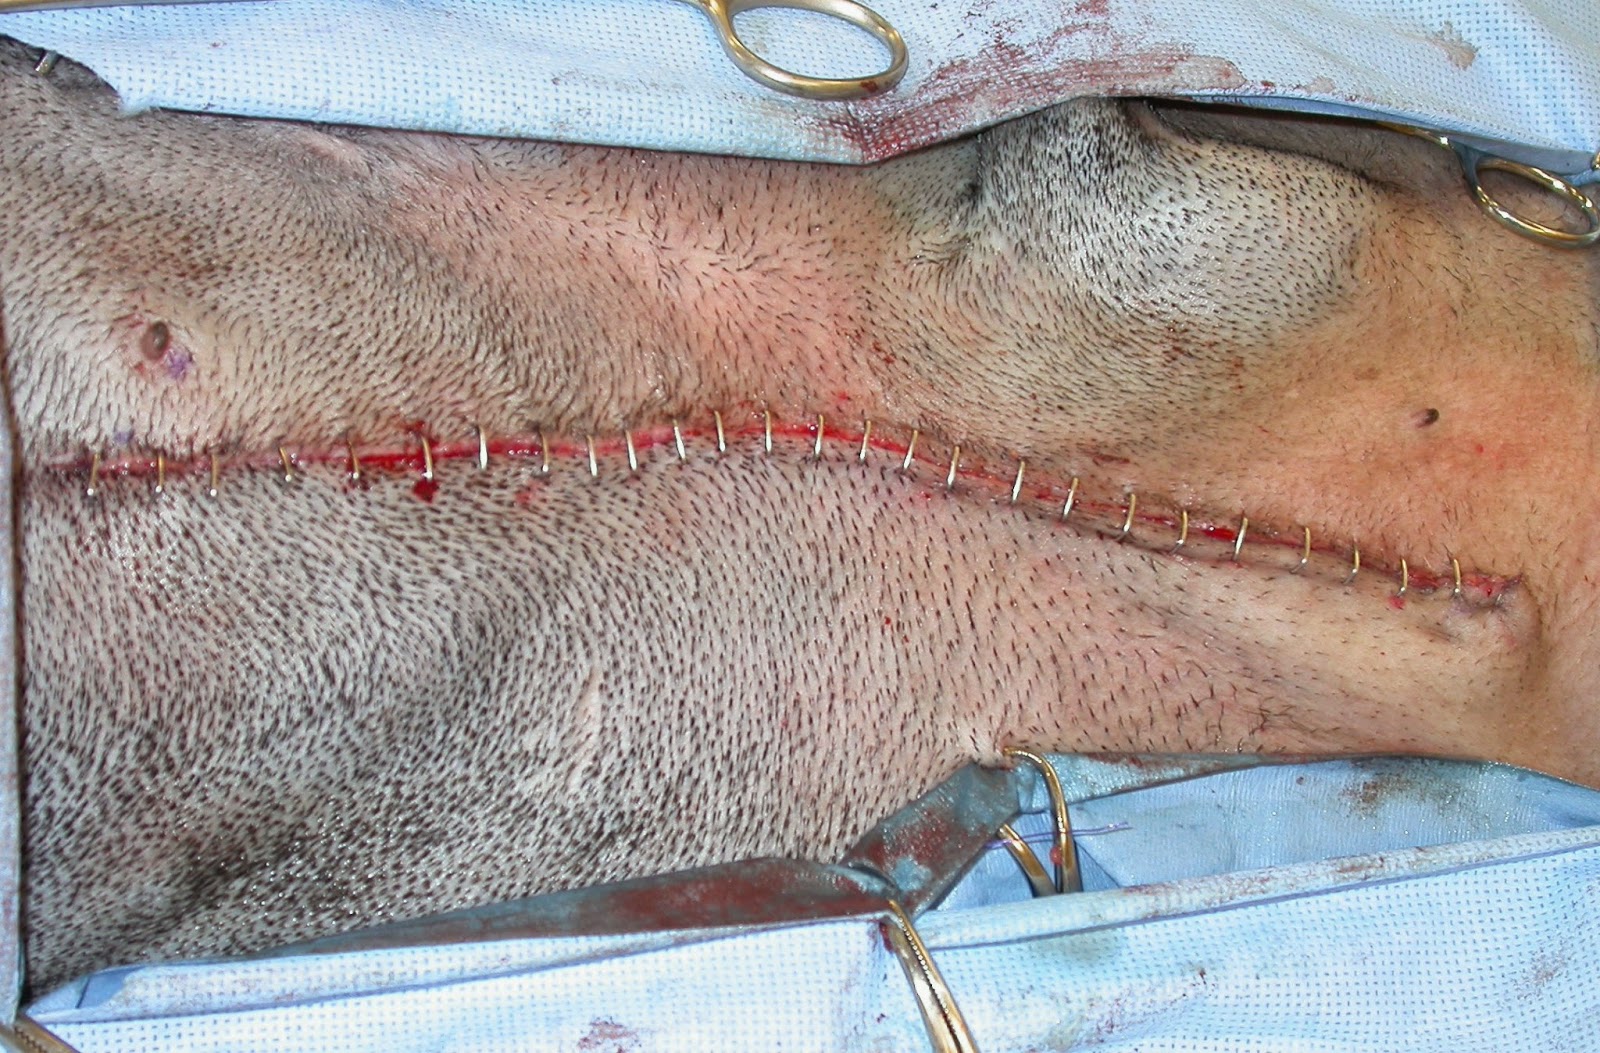
Fig. 5: Appearance of the surgical incisions on Ginger 10 days postoperatively.
Ginger finally was discharged with no rechecks necessary unless problems arose. However 5 months later she represented to MedVet Toledo for problems unrelated to her elbow. The owner reported that since the skin flap reconstruction Ginger had been much more comfortable and mobile. Ginger’s skin flap had grown a thick, bushy amount of hair. There was redundant skin at the elbow but the overall cosmetic appearance was quite satisfactory. (Fig. 6) In general the owner was very pleased with the end result of the reconstruction.
Fig. 6: Appearance of Ginger's right elbow area 5 months after reconstruction.
Chronic wounds of the elbow in dogs are one of the most difficult to manage. Skin tension, excessive motion, and trauma to the area combine to interfere with healing in this part of the body. Debridement and local advancement of skin over the defect is generally unrewarding for reconstruction, particularly if it results in a suture line directly over the olecranon. Skin flap techniques that bring healthy, robust tissue into the site without creating a suture line over the olecranon, such as an axial pattern flap, is more likely to be successful.

Several aspects of the postoperative care are key to the success of this procedure. A well-padded bandage to protect and cushion the skin flap is mandatory for at least 10-14 days postoperatively. Exercise restriction is also important along with frequent postoperative rechecks to monitor for flap survival and healing. 

One clinical study of 10 dogs having thoracodorsal axial pattern flaps found complications to be common but good functional and cosmetic outcome resulted in 6 of 7 dogs long term follow up. (1)

References

1. Aper R, Smeak, D:  Complications and Outcome After Thoracodorsal Axial Pattern Flap Reconstruction of Forelimb Skin Defects in 10 Dogs, 1989–2001 32:4, 2003, Pages 378-384.

Monday, November 3, 2014

Closure of Elliptical Incisions in Dogs: The "Rule of Halves"

Elliptical incisions commonly result from removal of skin tumors, other lesions, or debridement of traumatic wounds. Since loss of a section of skin occurs, the closure of the defect can result in so called “dog-ears” at each end of the incision (small flaps of skin that protrude from the ends of the incision).  An easy method to prevent dog-ears and create a cosmetic and secure closure is the “rule of halves” technique, also called bisectional closure. (Fig. 1)
Fig. 1: The rule of halves for closing elliptical incisions.
Dotted lines represent placement of sutures
This technique is used for the deep fascia and subcutaneous layers of the wound. The sutures below the skin relieve the tension across the incision and align the skin edges making the final suturing of the skin much easier.

Technique for the Rule of Halves Closure

Take the first suture bite of the deep fascia and/or subcutaneous tissue in the middle of the incision. (Fig. 2)
Fig. 2: Surgical model of elliptical incision.
The subcutaneous tissue is red, the skin is pink.
Dotted line indicates where first subcutaneous suture is placed.
This divides the incision into 2 equal parts. (Fig. 3)
Fig. 3: First subcutaneous suture has been placed.
Dotted lines indicate placement of the next 2 sutures.
Now take suture bites in the middle of each of the 2 defects, then in the middle of the 4 defects, and so on until the subcutaneous layer is completely closed. (Fig. 4) 
Fig. 4: Final subcutaneous suture being placed. Note that the suture knot
is buried by taking the first bite, from inside out, on the side closest to the surgeon.
Then suture the skin routinely. (Fig. 5)
 
Fig 5: Completed closure

This technique for wound suturing, although somewhat more time consuming than doing simple continuous patterns for the subcutaneous layer, results in a very secure and cosmetic closure. (Figs. 6-8)
Fig. 6: Proposed lines for excision of a mast cell tumor in a dog.  (X = tumor,
circle indicates 3 cm margins, elliptical lines are proposed incision)
Fig. 7: Same dog as in Fig. 6 after excision of the tumor and surrounding skin.
Dotted line indicates location of first suture.
Fig. 8: Completed closure of same dog in Fig. 6.

Post questions or comments here or on my Facebook page (Dr. Stephen Birchard, Veterinary Continuing Education)


Tuesday, April 1, 2014

Large Skin Defects in Dogs and Cats Treated With Axial Pattern Flaps (And one case where puppies are nursing from the leg!)

Fig. 1: Diagram of basic steps for caudal superficial epigastric axial pattern skin flap.
From: Birchard SJ, Smeak DD. Selected skin graft and reconstructive techniques. In: Saunders Manual of Small Animal Practice. 3rd edition, Birchard and Sherding, eds., Elsevier, St. Louis, 2006. Pg 557

Axial pattern flaps are skin flaps that are developed using a major direct cutaneous artery as the primary blood supply.  Considerably more flexibility in the length and mobility of these flaps is possible compared to random skin flaps (e.g., the one used in Hershey; see blog from 2/24/14).  These flaps can be made with long vascular pedicles to transfer skin to more remote areas of the body compared to random flaps.  This is because of preservation of the direct cutaneous artery allowing adequate perfusion of a large area of tissue.  
Axial pattern flaps can be based upon many direct cutaneous arteries, such as the caudal superficial epigastric, cervical cutaneous branch of the omocervical, thoracodorsal, deep circumflex iliac, and the genicular branch of the saphenous artery.  The caudal superficial axial pattern flap is commonly used for large defects of the proximal thigh and flank.  The thoracodorsal axial pattern flap is used for defects of the distal humeral area or elbow. These 2 techniques will be described here.  However, other axial pattern flaps as listed above can be created using similar principles and are described in current veterinary surgical textbooks.

Indications
Indications for axial pattern flaps are similar to random subdermal flaps except that these flaps are used when the skin defect is very large. Large skin defects that occur due to trauma, mass excision, or other etiologies resulting in a loss of skin could benefit from this reconstructive technique. A major direct cutaneous artery and vein must be fairly close to the skin defect for this technique to be indicated.

Surgical Procedures
Caudal Superficial Epigastric Axial Pattern Flap
Use similar preparation and tissue handling principles described for advancement or rotation flaps. Be particularly careful when positioning the patient such that the vascular pedicle will not become distorted before planning your incisions.  Incisions are created as shown in Figure 1.  The mammary chain up to and including the 3rd gland can be included.  Deeply undermine the flap just superficial to the abdominal fascia. Dissect very carefully around the origin of the direct cutaneous vessel to avoid inadvertent damage to this vessel that is vital to the survival of the flap.  Avoid creating a kink in the base of the flap that could obstruct blood flow. (Fig. 2)
Fig. 2: Caudal superficial epigastric axial pattern flap to close a medial  thigh wound
Drain the dead space if needed with a closed suction drain and suture the flap to the defect as described for the other flap techniques. Close the donor site after closing the flap.
Fig. 3: Healed caudal superficial flap on the stifle of a dog. Note nipples that have been transposed with the flap.
Fig. 4: Caudal superficial axial pattern flap was performed on this in tact female dog that subsequently got pregnant. Puppies are nursing from the transposed mammary glands on the leg. From: Pavletic MM. Axial pattern flaps in small animal practice. Vet Clin North Am Small Anim Pract. 1990 Jan;20(1):105-25.
Thoracodorsal Axial Pattern Flap
Fig. 5: Diagram of basic steps for thoracodorsal axial pattern flap.
From: Birchard SJ, Smeak DD. Selected skin graft and reconstructive techniques. In: Saunders Manual of Small Animal Practice. 3rd edition, Birchard and Sherding, eds., Elsevier, St. Louis, 2006. Pg 557
A rectangular flap of skin is created based on the thoracodorsal artery (Fig. 6) 
Fig. 6: Thoracodorsal flap planned for this non-healing wound secondary to tumor removal followed by radiation therapy. Four previous attempts to close thewound had been performed. 
Lines indicate proposed incisions; X marks the origin of the thoracodorsal artery.
The flap is undermined deep to the cutaneous trunci muscle and rotated to cover the defect. A bridging incision is made if necessary to allow suturing the flap to the skin proximal to the defect. The flap is rotated to the defect and sutured in place. (Fig. 7)
Fig. 7: Same dog as figure 5 with completed flap
Fig. 8: Same dog as figure 5, 2 weeks postoperatively
Care and Complications (All flap types)
Restrict exercise until suture removal. Apply an Elizabethan collar before the patient is recovered from anesthesia and leave on the animal until the flaps are completely healed. Place a well-padded bandage on the front leg after thoracodorsal flaps are used to cover the elbow. Pressure necrosis of the potion of flap directly over the elbow can occur if not protected and cushioned. Change wound dressings as necessary.
Major complications resulting from skin flaps include local wound problems such as:  partial or total ischemia of the flap, infection, seroma, and dehiscence of the flap or donor suture line. Mild bruising of the flap for the first few days postoperatively is expected. Severe discoloration with a sharp demarcation between normal and abnormal skin is likely indicating flap ischemia and impending necrosis. Dehiscence of donor site incisions is usually due to excessive skin tension.  If dehiscence occurs, allow these areas to heal by second intention.

References

  1. Birchard SJ, Smeak DD. Selected skin graft and reconstructive techniques. In: Saunders Manual of Small Animal Practice. third edition, Birchard and Sherding, eds., Elsevier, St. Louis, 2006. Pg 557
  2.  Aper R1, Smeak DD. Complications and outcome after thoracodorsal axial pattern flap reconstruction of forelimb skin defects in 10 dogs, 1989-2001. Vet Surg. 2003 Jul-Aug;32(4):378-84.
  3. Aper RL1, Smeak DD.Clinical evaluation of caudal superficial epigastric axial pattern flap reconstruction of skin defects in 10 dogs(1989-2001). J Am Anim Hosp Assoc. 2005 May-Jun;41(3):185-92.
  4. Pavletic MM. Axial pattern flaps in small animal practice. Vet Clin North Am Small Anim Pract. 1990 Jan;20(1):105-25.


Thursday, March 20, 2014

Case outcome: Punch skin grafts help Toro make a full recovery from his severe burn injuries!

Outcome on Toro:

Burns in dogs and cats are classified as either full or partial skin thickness. This classification system is different than the 1st degree, 2nd degree, and 3rd degree scheme used in people. The blood supply to the skin is dogs and cats is different than in humans. Dog and cat skin does not blister as in people, hence the need for a different classification system for burn injury. Toro’s burns were a combination of both partial and full thickness.

Our initial therapy consisted of supportive care with analgesics, antibiotics, and wound management. The wounds were clipped, cleaned, lavaged with sterile saline, and surgically debrided where necessary. Wet to dry tie-over bandages were placed over all wounds including along his back and down the right thigh. The bandages were changed daily under general anesthesia.
 
Wet to dry tie-over bandages being applied to Toro. 
Completed tie-over bandage on Toro
The wound progressed well and good granulation beds developed in all areas. 
Appearance of wounds 4 days after admission; daily wet to dry
bandages had been applied under general anesthesia.
Four days after admission, punch skin grafts were performed on the granulated areas to encourage epithelializatization. Non-adherent tie-over dressings were used over the wounds after grafting to prevent dislodgement of the skin punches.
Punch skin grafts are being harvested from adjacent skin and applied
to several areas of the granulation tissue.
Appearance of Toro's wounds immediately after punch
skin grafting procedure performed.
6 days after punch grafting was performed.
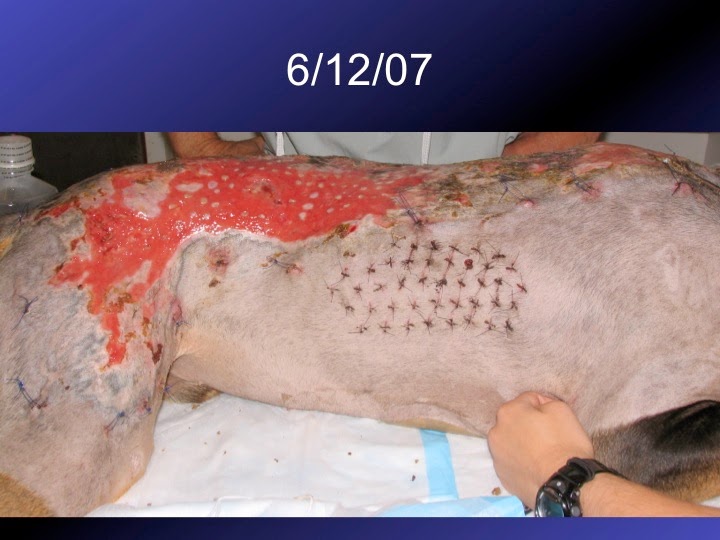
9 days after punch grafting performed. Note multiple rounds areas
of epithelium forming at the site of each graft. 
Toro was discharged 15 days after admission to the hospital. Oral analgesics were prescribed and further bandage changes performed by the referring veterinarian. A recheck exam was done on Toro 18 days after admission. His bandages were removed and topical silver sulfadiazine cream was prescribed for topical treatment of his remaining wounds.
15 days after admission. Toro was discharged from the hospital
Two months later Toro came back to OSU for a recheck. His wounds were almost completely healed and he was doing well. Toro’s aggressive personality remained, however.
 
Here is Toro 2 months after initial treatment at Ohio State.
Toro's left side.
Close up of the epithelialized and contracted wounds over the right flank.
The remaining small granulated wounds gradually healed over the next several days.
Punch Skin Grafts

Punch grafts are a practical form of free skin grafts that are easy to perform and require no special instrumentation. If performed properly and skin punches are placed in healthy granulation tissue they usually take very well. However, since little to no hair growth occurs punch grafts do not provide a high degree of cosmetic benefit.  In Toro our goal was to accelerate epithelial coverage of the large areas of granulation tissue.

For more information on skin grafts, see: Birchard SJ, Smeak DD. Selected skin graft and reconstructive techniques. In: Saunders Manual of Small Animal Practice. 3rd edition, Birchard and Sherding, eds., Elsevier, St. Louis, 2006. Pg 557.

Thank you for participating in the story of Toro! I'll be happy to answer any questions you have about Toro either here or on facebook.